


|
|
|
First time Willys owner, new project |
Post Reply 
|
Page <1234 12> |
| Author | |
GalenHorton 
Member 

Joined: 03 Nov. 2005 Location: Bella Vista, AR Status: Offline Points: 291 |
 Post Options Post Options
") Thanks(0) Thanks(0)
 Quote Reply Quote Reply
 Posted: 27 Apr. 2014 at 12:34am Posted: 27 Apr. 2014 at 12:34am |
|
Save that steering wheel! Always makes for a good garage deco & conversation piece!
|
|
|
Galen in Northwest Arkansas
1947 CJ2A 1953 M38A1 2011 JK Wrangler Unlimited Sport |
|
 |
|
|
LesBerg
Member

Joined: 09 Apr. 2014 Location: Athol, ID Status: Offline Points: 1554 |
Post Options
Thanks(0)
Quote Reply
Posted: 27 Apr. 2014 at 1:51am |
|
That's the plan

|
|
|
|
|
gostby
Member
Joined: 05 Jan. 2013 Location: Lincoln WA Status: Offline Points: 334 |
Post Options
Thanks(0)
Quote Reply
Posted: 28 Apr. 2014 at 3:53pm |
|
Les: Please call me at 509 636 2850. Thanks, Gary
|
|
|
gostby
|
|
|
|
|
gostby
Member
Joined: 05 Jan. 2013 Location: Lincoln WA Status: Offline Points: 334 |
Post Options
Thanks(0)
Quote Reply
Posted: 28 Apr. 2014 at 3:57pm |
|
Les: Now you won't have to call me, my reply is working. I have to go to the Spokane Valley Mall or Airway Heights or wherever sometime this week. Maybe we should meet so I can unload some Willys parts on you. Gary
|
|
|
gostby
|
|
|
|
|
LesBerg
Member
Joined: 09 Apr. 2014 Location: Athol, ID Status: Offline Points: 1554 |
Post Options
Thanks(0)
Quote Reply
Posted: 29 Apr. 2014 at 5:02am |
|
sounds good. The only day I have booked this week is Wednesday. I have an appointment for contacts and lunch with my wife
 Sorry I missed your previous note, I spent the day welding on the Willys. Tomorrow she goes under the knife for some frame surgery. I'm hoping to order up some front end parts on Wednesday too. Maybe see if someone has some used front OEM springs they're willing to sell. I'm hoping to squeeze an air filter system in as soon as funds allow.
Edited by LesBerg - 29 Apr. 2014 at 5:07am |
|
|
|
|
gostby
Member
Joined: 05 Jan. 2013 Location: Lincoln WA Status: Offline Points: 334 |
Post Options
Thanks(0)
Quote Reply
Posted: 29 Apr. 2014 at 5:09am |
|
Les: How about Thursday, 10:00 AM, at the West entrance to Sears in the Valley Mall. I'll be the short, heavy, gray haired guy in a 03 blue Ford F150. Gary
|
|
|
gostby
|
|
|
|
|
LesBerg
Member
Joined: 09 Apr. 2014 Location: Athol, ID Status: Offline Points: 1554 |
Post Options
Thanks(0)
Quote Reply
Posted: 29 Apr. 2014 at 2:26pm |
|
great! I'll be the other grey-haired guy in a Ford pickup.. I'll be in 'Old Green', our 67 F100. See you there!
I don't have any spare Willys parts and I had to recycle almost all of the Ford and Mopar stuff a few years ago, but if you need a spare set of hands with a project in the future, let me know. Edited by LesBerg - 29 Apr. 2014 at 5:33pm |
|
|
|
|
LesBerg
Member
Joined: 09 Apr. 2014 Location: Athol, ID Status: Offline Points: 1554 |
Post Options
Thanks(0)
Quote Reply
Posted: 03 May 2014 at 3:11am |
|
I picked up the parts from Gary on Thursday. Many, many thanks. In addition to the steering wheel, he included a vintage fuel tank, an exhaust manifold, some primer, and a box of misc parts and lines.
The steering wheel is already on and the fuel tank will go in as soon as I have a reasonably correct driver's seat. I have the frame work completed. It's not pretty, but it won't fail in my lifetime. My boss, back when I worked at a diesel shop in Austin once compared my welding to what seagulls frequently left on the hood of his truck, except that the seagulls did a neater job... My welding has gotten much better, but not much prettier... Pics to follow, maybe this evening.
|
|
|
1948 CJ2A 157713 24" Stretch "Old Ironsides"
1st Armored Div 6th Infantry Reg 3rd Infantry Bn Headquarters Company #161 rubigo in quo speramus - "In Rust we Trust" |
|
|
|
|
LesBerg
Member
Joined: 09 Apr. 2014 Location: Athol, ID Status: Offline Points: 1554 |
Post Options
Thanks(0)
Quote Reply
Posted: 03 May 2014 at 5:15am |
|
Let me recap the frame damage:
At first, I thought it had been caused by overworking the CJ running the snow plow over some of the rough winters we've had up here. I gave that a LOT of thought. I mean, that was one of this thing's very reasons for existence. It just didn't feel right. It didn't matter in the end why it was broken, just that it was, and it needed to be properly fixed. So I pulled it up onto the concrete. Yep. No shop here, all work is out in the weather, whatever it may be. That's a big part of why I've been kinda scarce these last few days. We had some 75 degree days, and I've spent every waking moment welding, grinding, measuring, and leveling.... In taking the front end apart and cutting off the fish plates I got to take a real good look at the damage. I don't think it was plowing at all that caused it. Whatever it was caused the frame to completely and catastrophically fail at the radiator cross member. The welds at the ends of the cross member we broken with no bending or stretching. The left end of the tube was actually shattered. There were six or eight sharp cracks, with no evidence of bending or loading. The frame rails were torn on the bottom flange and buckled on top. The sides appeared shattered, much as the end of the cross member. I think that whatever broke this frame happened suddenly and violently, and the impact was from below. The only other damage is the spring packs themselves. They are mixed heavy and light springs, the eyelets have been broken off. The only thing I can think of is either driving off an embankment at speed or someone had the jeep airborne. Anyway, the pictures: Right side break: 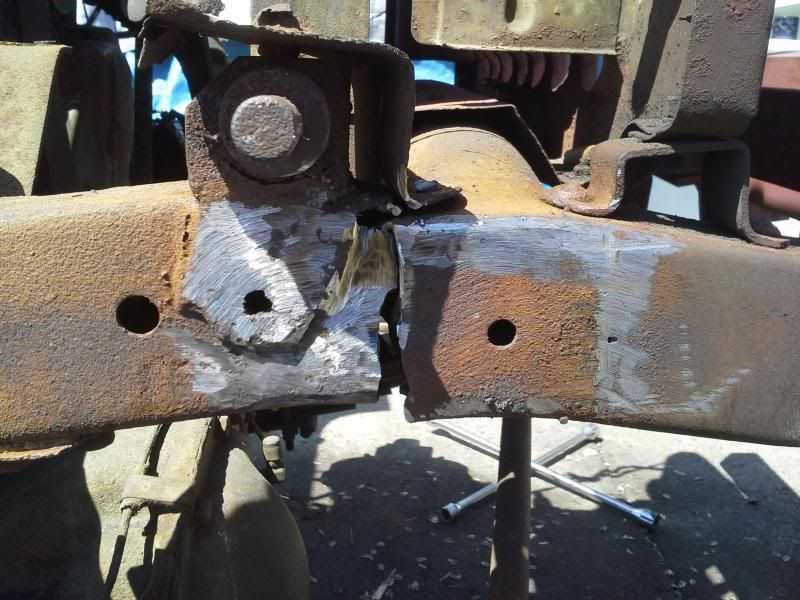 oh. when I unbolted the grille at this point, the frame horn fell off! left side break: 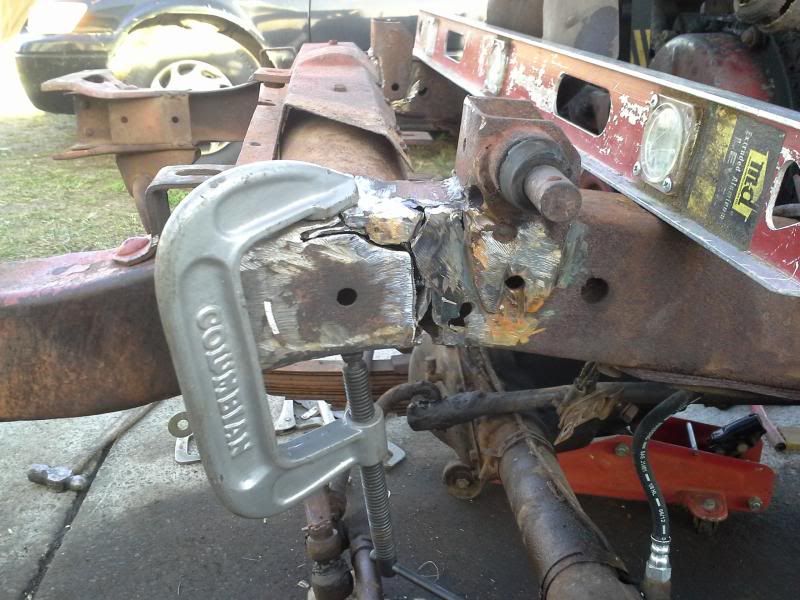 The other frame horn is welded back on in the above pic. The jacks (there is one under the left spring pack as well) support the axle in a 'neutral' position where the springs exert no load, either upwards or downwards, on the frame. The cross member: 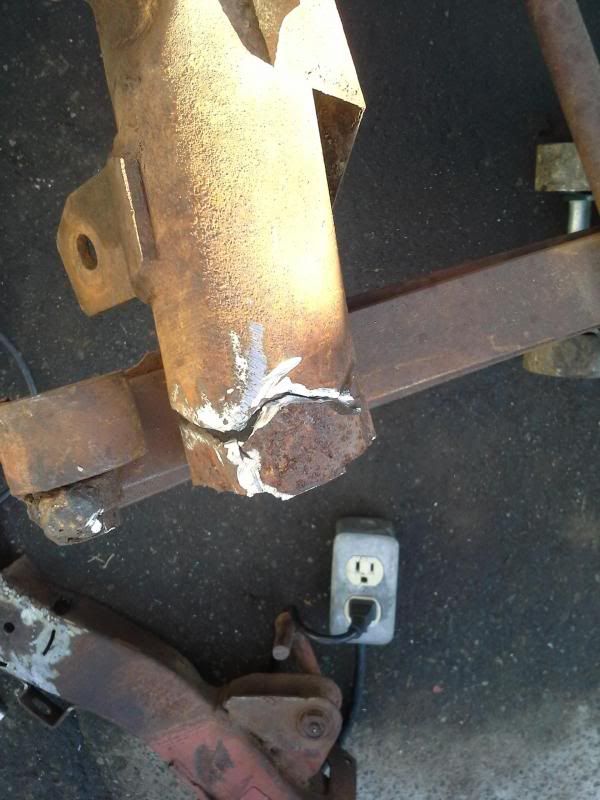 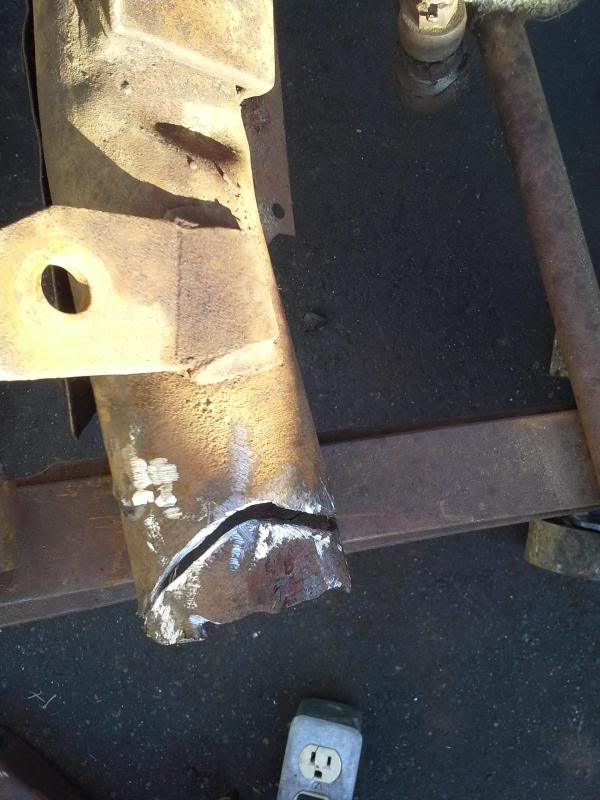 repairs under way: 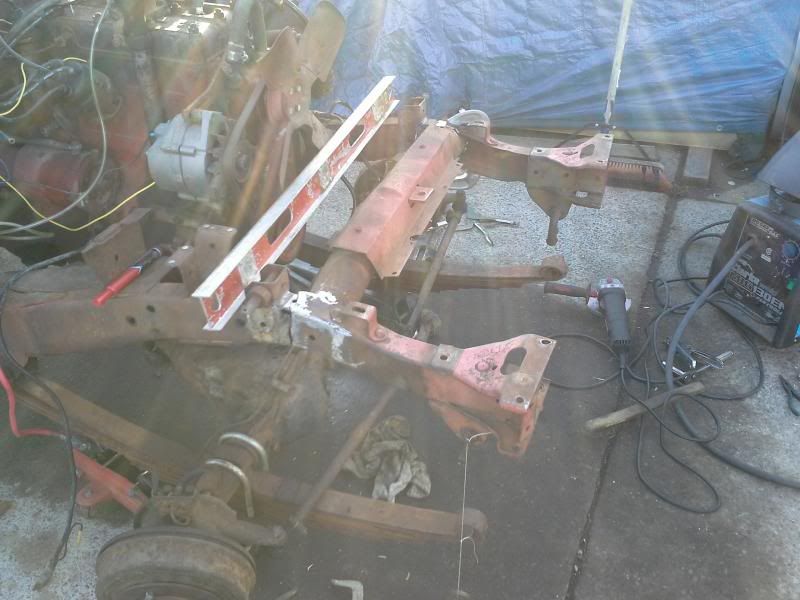 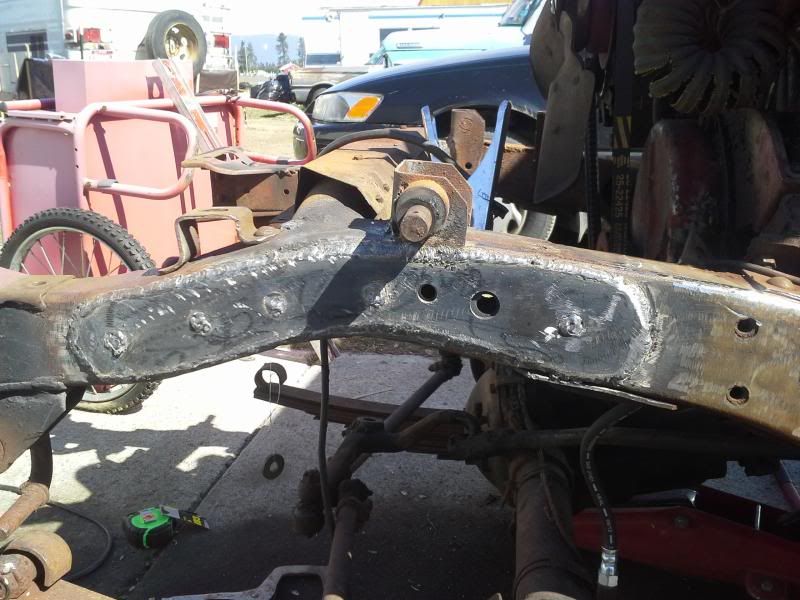 The plate is rounded and plug welded in five spots along the center line in addition to the perimeter weld. This adds strength and rigidity to the repair. If you were to have this repaired at a 'certified collision repair center' all efforts would be made to plate or splice the frame on the inside of the frame rail. Yeah, umm... good luck with that, eh? frame work completed, starting reassembly. I also plated the bottom of the frame on both rails: 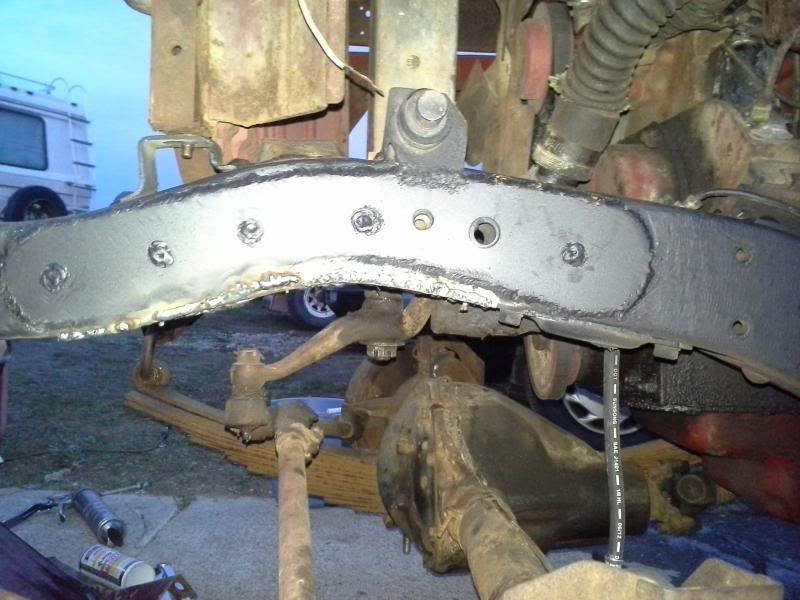 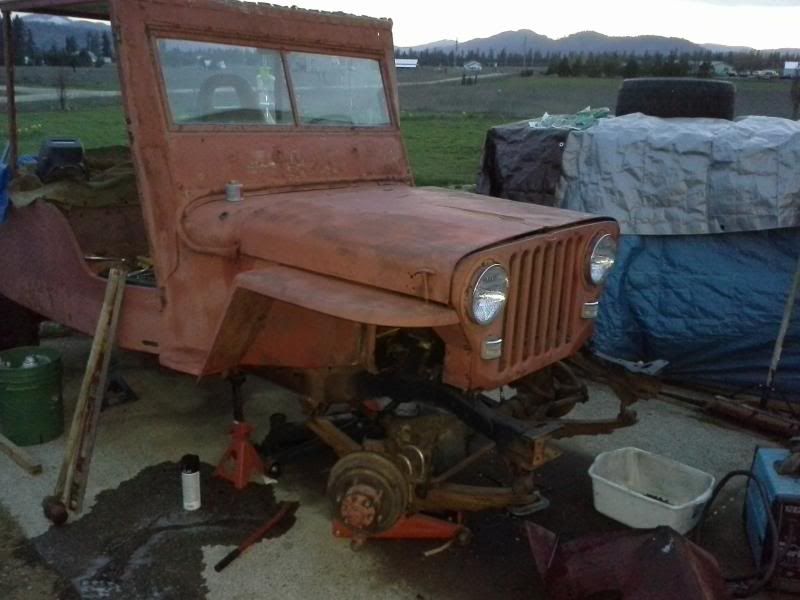 I wasn't sure what the hole under the shock mount is for or the sleeved hole 'behind' it, so I clearanced the holes and left them open for future stuff... pay no attention to the 'seagull crap' appearance of the weld. I'll hide it under mud ASAP  ummm.... does 'patina' wash off? Forget the canned orange, this girl is a natural Luzon redhead! 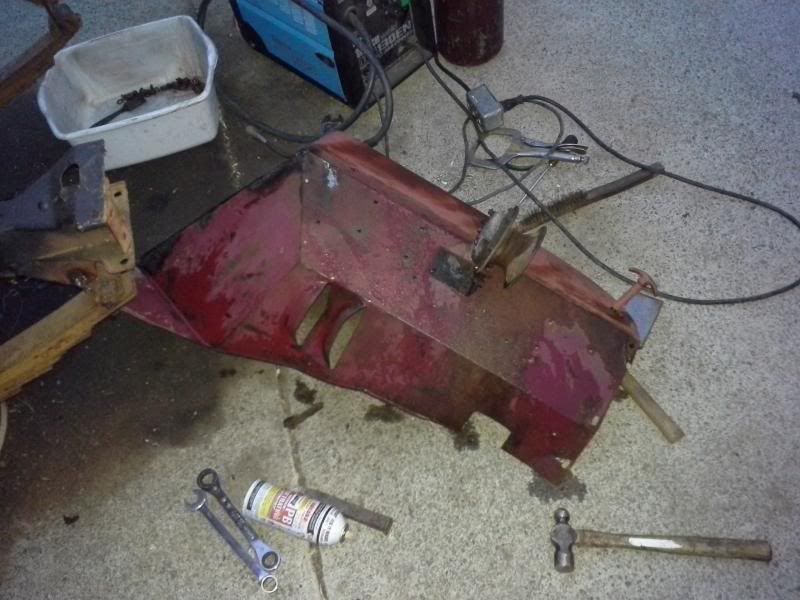 no, I didn't wash the fender that close to the welder. I have a little more sense than that. Oooh PB Blaster! The gods gift to mechanics everywhere! And finally, the young moose we saw on the way home from the 'carnival' at the kids school this evening. Hunting these buggers is half the reason I bought this thing 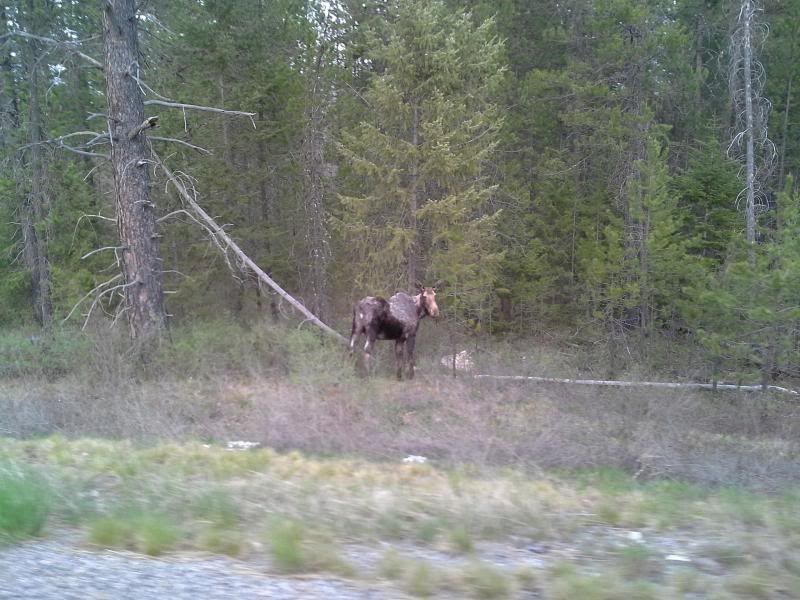 aaaand the other half: ...
Edited by LesBerg - 03 May 2014 at 5:44am |
|
|
1948 CJ2A 157713 24" Stretch "Old Ironsides"
1st Armored Div 6th Infantry Reg 3rd Infantry Bn Headquarters Company #161 rubigo in quo speramus - "In Rust we Trust" |
|
|
|
|
LesBerg
Member
Joined: 09 Apr. 2014 Location: Athol, ID Status: Offline Points: 1554 |
Post Options
Thanks(0)
Quote Reply
Posted: 06 May 2014 at 5:57am |
|
Quick update:
I got it all put back together Sunday afternoon. Had to So my daughter of twelve said that it 'sat prouder' than it did before and my wife said it no longer looked 'saddle broken'  My son's only comment was "When can we take it out?" My son's only comment was "When can we take it out?"Anyway, while installing the lower radiator hose, the epoxy-over-JB Weld repair on the lower hose bung gave out and it puked coolant everywhere. So out came the radiator and I got to play pyro-surgeon with a propane torch and a wad of solder. It still has a minor leak, but hopefully it'll hold until I can get it in to be properly repaired. Though I think I'd rather replace it with a correct shrouded 2A unit someday when I'm rich... Edited by LesBerg - 20 May 2014 at 3:04am |
|
|
1948 CJ2A 157713 24" Stretch "Old Ironsides"
1st Armored Div 6th Infantry Reg 3rd Infantry Bn Headquarters Company #161 rubigo in quo speramus - "In Rust we Trust" |
|
|
|
|
LesBerg
Member
Joined: 09 Apr. 2014 Location: Athol, ID Status: Offline Points: 1554 |
Post Options
Thanks(0)
Quote Reply
Posted: 20 May 2014 at 2:58am |
|
Quick update:
pulled the custom fuel tank, and as I cut the last tank-to-body weld the tub 'popped'. If you look through the pictures I posted early on, you can see that the windshield sits 'cocked' with respect to the tub. The tub was also twisted a bit - when viewed from the side, the left rail was high in the back and dropped in the front, and the right side of the top of the tub was just the opposite. Well, it seems that it was a twist put into the tub when the fuel tank was welded in, as that 'pop' was the tub springing back into shape. The windshield sits square and the tub rails are now parallel as seen from the side of the tub. I have a few parts to install, including a 'gently' used exhaust system complete with surface patina, er.... rust, new master cylinder, and left side knuckle bearings. now all I need is 'cash flow' and some steel for the floor....
Edited by LesBerg - 20 May 2014 at 3:00am |
|
|
1948 CJ2A 157713 24" Stretch "Old Ironsides"
1st Armored Div 6th Infantry Reg 3rd Infantry Bn Headquarters Company #161 rubigo in quo speramus - "In Rust we Trust" |
|
|
|
|
LesBerg
Member
Joined: 09 Apr. 2014 Location: Athol, ID Status: Offline Points: 1554 |
Post Options
Thanks(0)
Quote Reply
Posted: 20 May 2014 at 3:02am |
|
Oh! I also got all the plating cut from around the windshield frame and freed up / cleaned up the inner windshield frame.
I'll post a bunch of pictures tomorrow - I've been out of town helping out my uncle down in Pasco
|
|
|
1948 CJ2A 157713 24" Stretch "Old Ironsides"
1st Armored Div 6th Infantry Reg 3rd Infantry Bn Headquarters Company #161 rubigo in quo speramus - "In Rust we Trust" |
|
|
|
|
LesBerg
Member
Joined: 09 Apr. 2014 Location: Athol, ID Status: Offline Points: 1554 |
Post Options
Thanks(0)
Quote Reply
Posted: 20 May 2014 at 4:31am |
|
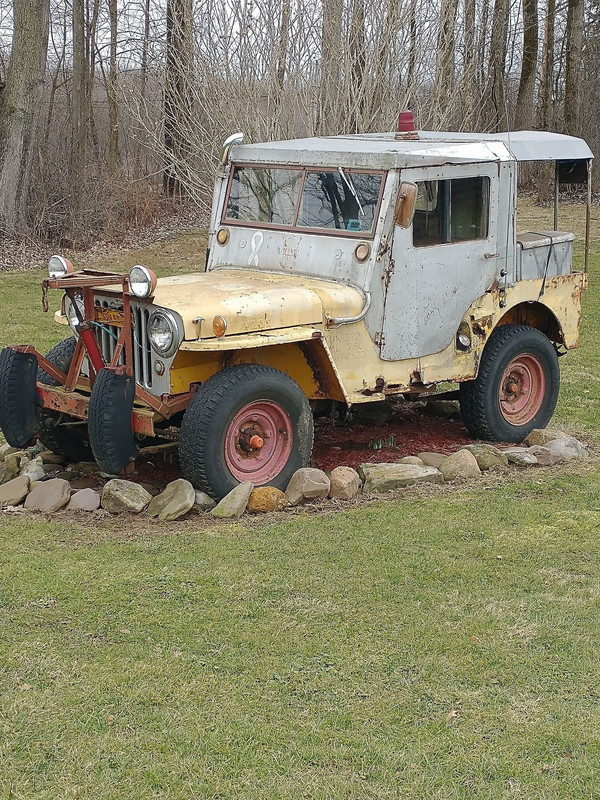
First, pics of the steering wheel from Gary. Thanks again for the parts!
 Pics after the frame repair, completely reassembled: 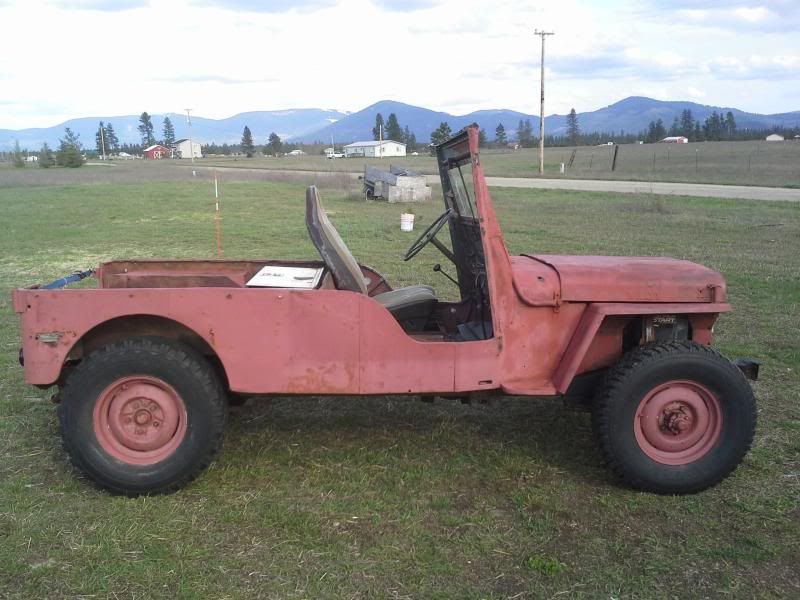 It sits a bit higher, straighter, and more level. If you look closely, you'll see that the top edges of the tub aren't parallel, and that ratchet strap isn't for safety. It pulls the sides together so the sides are vertical... With the fuel tank, driver's seat, and 'bulkhead' pulled: 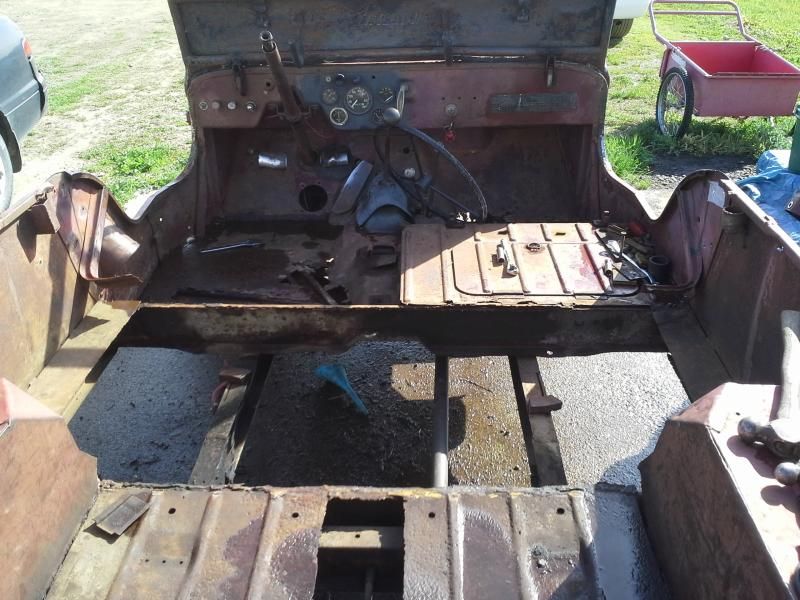 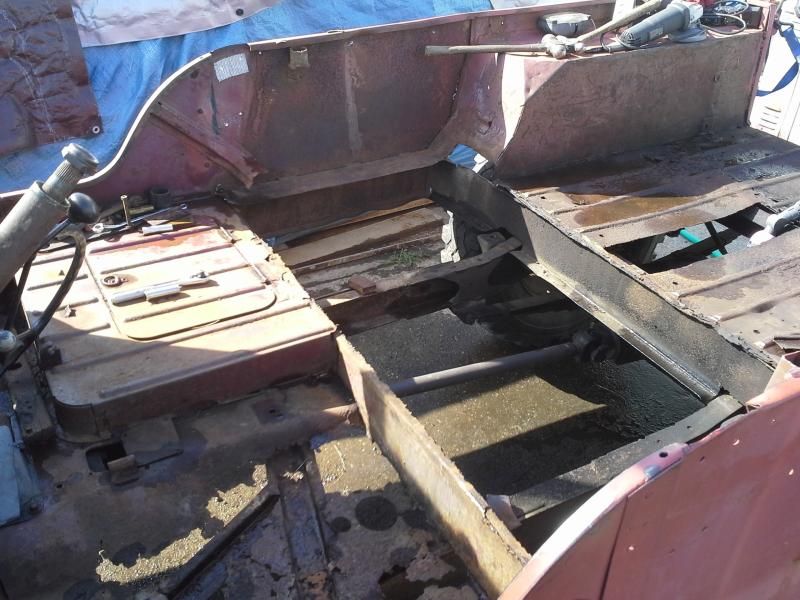 I think the ventilated driver's floor was a 'bubba' fix. I'm pretty sure it's not factory....  With her eyebrow(s) shaved - I removed the 3/16" plate welded around the windshield. It went surprisingly quick and easy. I'll need to reinforce it later, maybe even replace the upright tubes at some point, as they've been welded and brazed several times on both sides: 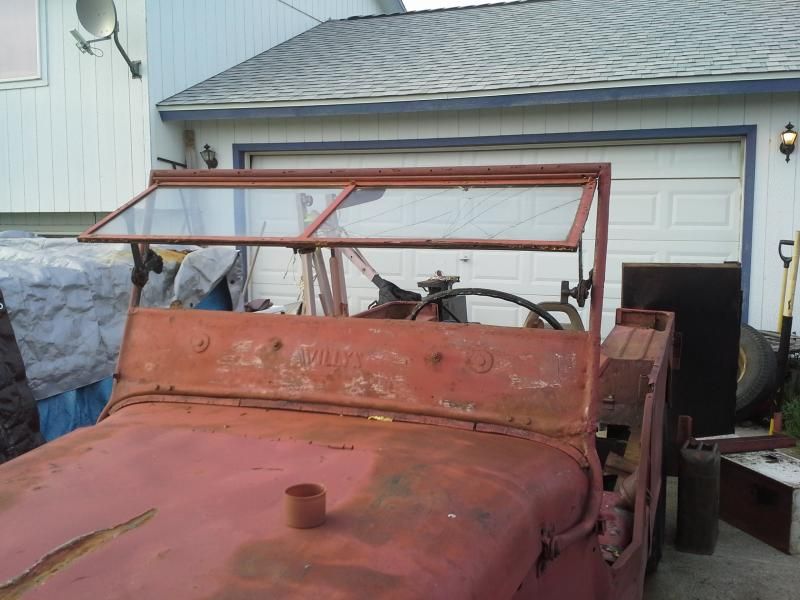 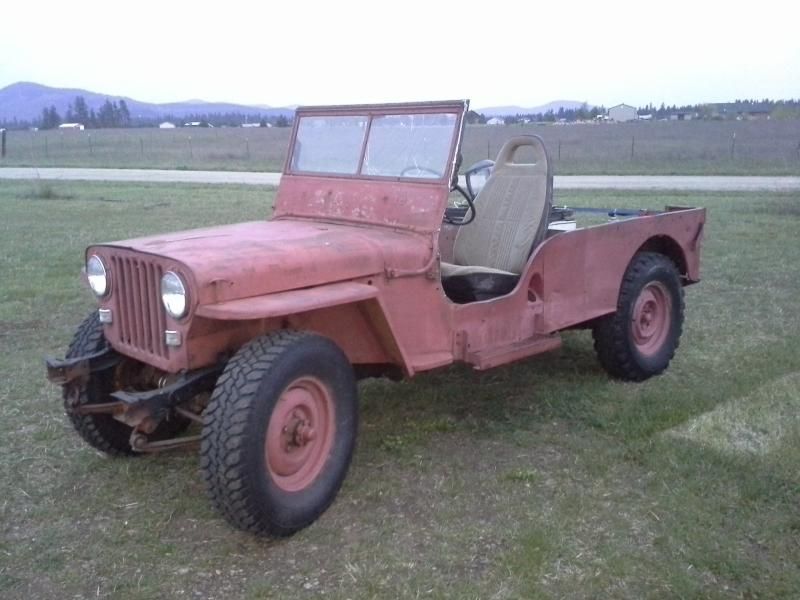 I dressed the wounds with 'spray patina' so she wouldn't rust up... I measured the custom fuel tank. It measures 48"w x 24"d x 6.25"h. Ignoring the 3/16" construction, it calculates to just over 31 gallons! When I get the stock tank mounted (a gift from Gary!) we'll be sporting just over 40 gallons of fuel capacity. I'm planning on setting the body just high enough off the frame that I can fab a one-piece floor for the back and fit the custom tank below the floor. It shouldn't need to be more than an extra inch over the stock. The tub was stretched right where the body mount behind the driver's seat is located. The catch is that there aren't any (usable) mounts between the one at the driver's feet and the one over the rear axle. I suspect that's the whole reason the tub collapsed onto the frame. 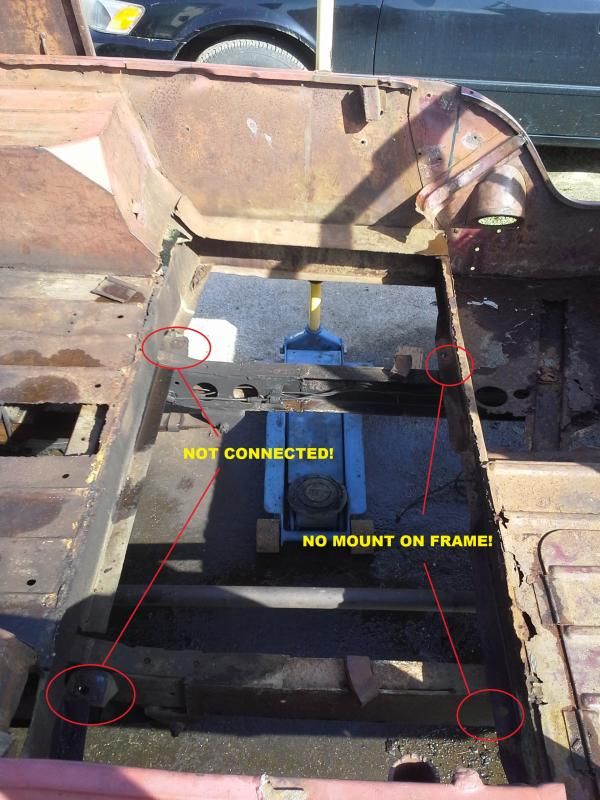 Speaking of which, body pad kits come with 12 pads and I count 12 stock body mount locations. Is there supposed to be a rubber pad between the tub and frame at every bolt location? I'm asking because the bolts that attach the tub floor to the crossmember above the rear axle have no pads. Should there be pads installed there? I can't think about how to describe the body mount plans. The tub was split right on top of the body mount behind the front seats. Because of this, there are holes in the tub floor for the mount in two places: right behind the seats, and just in front of the wheel house (picture above added for clarity). The idea is to add mounts in both places on both sides, effectively adding two extra body mounts to the system. I'm going to (safely) weld tabs on the fuel tank to mount it on top of the body mounts, flush with the top of the frame, then space the tub above that. The only thing preventing this from only needing about an extra 1/2 inch of space between the frame and tub would be hat channels for the floor above it. To fill the custom tank, I'm planning on adding a stock-style filler neck to the tank and a second filler pocket to the tub, just about where the floor jack handle is in the pic above. I'm also considering adding the pioneer tool indents on the driver's side and creating a 'new' custom indent on the passenger side for a high-lift / handyman style jack. Edited by LesBerg - 20 May 2014 at 4:38am |
|
|
1948 CJ2A 157713 24" Stretch "Old Ironsides"
1st Armored Div 6th Infantry Reg 3rd Infantry Bn Headquarters Company #161 rubigo in quo speramus - "In Rust we Trust" |
|
|
|
|
zooke581
Member
Joined: 18 Feb. 2013 Location: Pilot, VA Status: Offline Points: 871 |
Post Options
Thanks(0)
Quote Reply
Posted: 20 May 2014 at 1:31pm |
|
I put pads on all mine but on all mine but putting them under the tub raised it too high over the rear bumper. Maybe they don't go there. I will have to check that out.
You've been busy. I have been away from mine for three days due to repairs on the regular vehicles. Looking much better. Patina in spay can?
|
|
|
General William C. Lee Chapter of the 101st Airborne Division Association. B Btry 1/321 FA 76-78
http://va101stairborne.com http://sundialmotosports.com http://kalamals.com |
|
|
|
|
LesBerg
Member
Joined: 09 Apr. 2014 Location: Athol, ID Status: Offline Points: 1554 |
Post Options
Thanks(0)
Quote Reply
Posted: 26 May 2014 at 6:22am |
|
Made some progress today, had some setbacks too. Had to happen sooner or later.
There's a junkyard in Spokane that uses a 'fixed pricing' model, with amazingly low prices and a fast turnover. You can buy any engine in the yard for $140, whether it's a tiny 4-banger or a 460ci V8. Transmissions are $75... you get the idea. I had to run over to Pull and Save for parts for Old Green, our 67 Ford F100 franken-truck, and I found a new section. They had a half-dozen antique commercial trucks. One was a forties Chevy of some sort - I read the name, but it didn't stick. I got an aftermarket four-wire turn signal unit off it for $12. It looks like it was added sometime in the 50's or so. It's old and the patina matches the CJ  The unit has a hard rubber wheel on it that is meant to contact the bottom of the steering wheel for an 'auto canceling' feature. The unit has a hard rubber wheel on it that is meant to contact the bottom of the steering wheel for an 'auto canceling' feature.Gary gave me a couple of early front parking lights that need some love, so I'm thinking to fab some new bolts, find some lenses, and figure out where to mount them where the can be seen from the front and side, and use them for the front turn signals. I still need to find lights for the rear, unless someone knows how to rig a four-wire turn signal to piggyback the brake lights. My apologies for the picture quality. I took them at dusk with a cell phone. 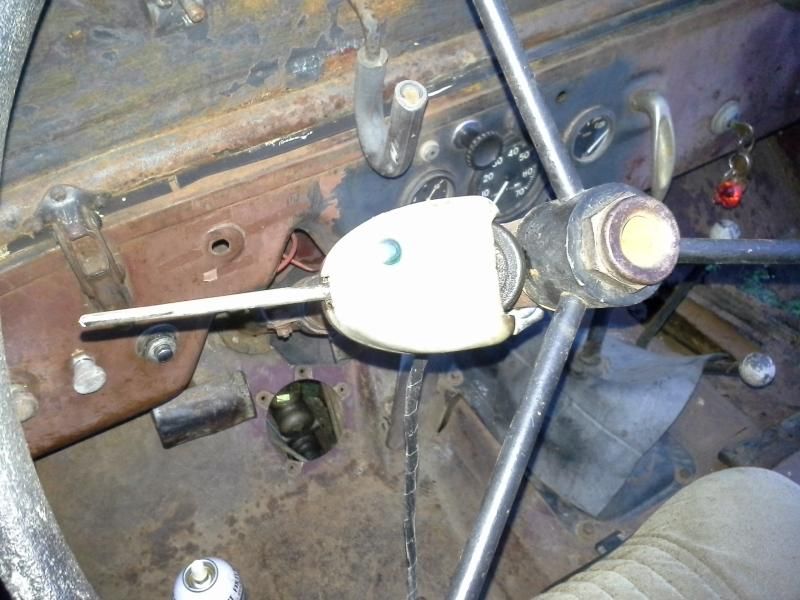 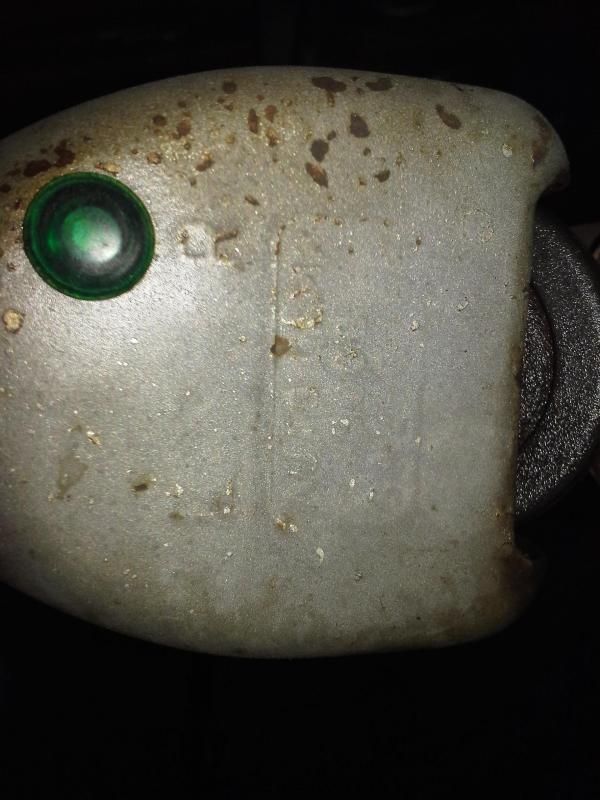 I also nabbed a speedo cable - it was an absolutely perfect fit. $1 I also grabbed a pair of headlight trim rings from an old Winnebago, but the inner diameter is too large for the CJ. $8, but useless to me... And the 'find of the year' goes to the pair of rims sitting under an old jeep truck frame. The first rim was buried under crap on the back - the way the yard guys stack discarded parts before the remains of a vehicle gets crushed. The other rim was under the flathead six that had been dropped between the frame rails. One is a dead-on correct 16x4.5 WO K&H rim, and the other is so close it took hours for me to notice it was different. The second rim has a 1/2 inch wide flat area between the convex section of the wheel center and rim itself. I'm curious what it's from. I know it was on the truck I found the rims with - the tires on them match. $12 each 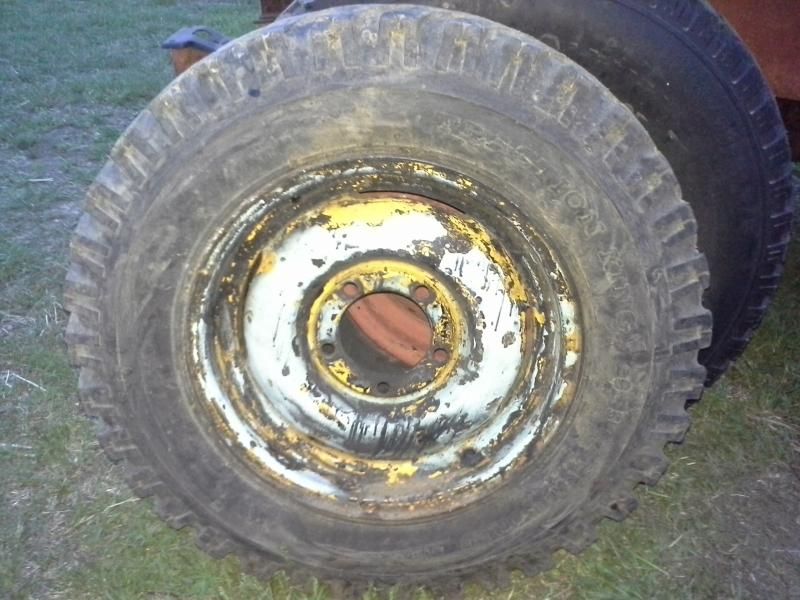 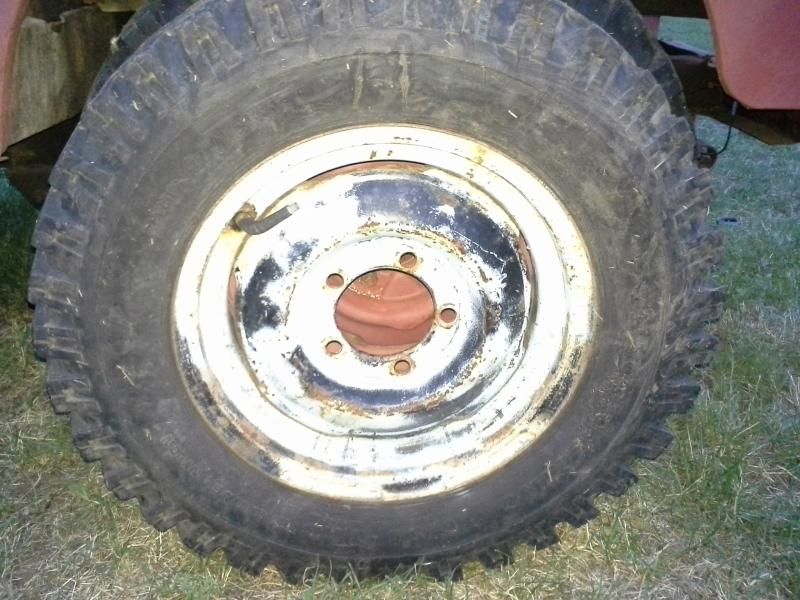 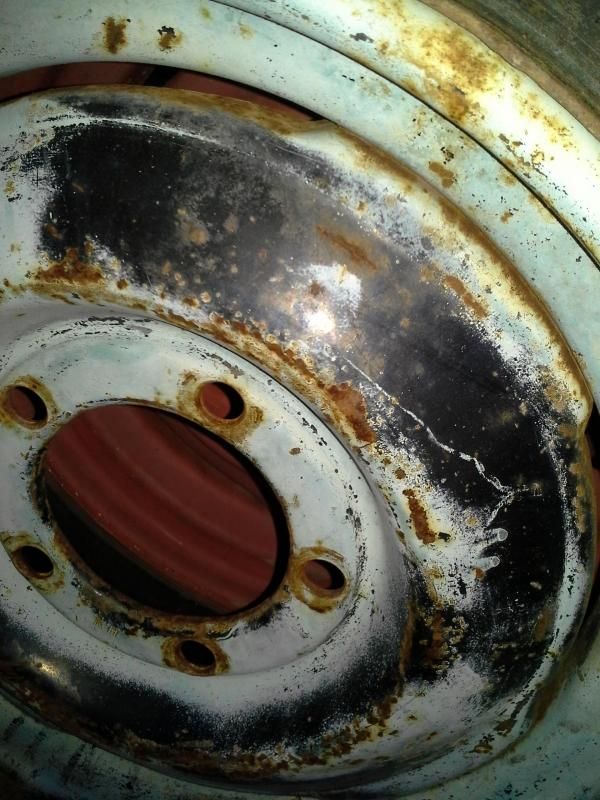 Now I have four rims that fit any position on the truck, and two that only fit the rear. I'm hoping to eventually have six correctly rims with matching tires. After last weekend's trip up into the mountains, I'm packing two spares into the boonies when I go. We took our 95 WV Golf out over Moon Pass, just south of Wallace, Idaho. Somehow we ran over something 22 miles into the back country that took out both passenger side tires. Luckily I'm a fairly paranoid guy and we happened to have two spares with us, one full size and a donut. The CJ got a new master cylinder last week. I haven't had time to bleed and adjust the brakes yet, or install the new knuckle bearings. On to the setback. The CJ has been running like a top for the most part, but after doing the work in on of the last posts, it started sputtering and wouldn't run. I assumed it was because I filled the gas tank with water so I could safely use a grinder to cut some angle iron off of it. Of course I drained the tank and let it dry for a couple days, but thats no guarantee that I got the water out... The problem wasn't water. Murphy's Law bit me: law #2: The carb float.... doesn't. The float developed a leak and needs to be replaced. So now I'm in for a $100 for a float and a rebuild kit. Thanks Murphy. I was hoping to pick up some steel for the floors with that cash. Tune in next week for the next episode of "This Old Willys". Same Willys time, same Willys station...
Edited by LesBerg - 26 May 2014 at 6:39am |
|
|
1948 CJ2A 157713 24" Stretch "Old Ironsides"
1st Armored Div 6th Infantry Reg 3rd Infantry Bn Headquarters Company #161 rubigo in quo speramus - "In Rust we Trust" |
|
|
|
|
mikec4193
Member
Joined: 23 May 2009 Location: Malta NY Status: Offline Points: 1161 |
Post Options
Thanks(0)
Quote Reply
Posted: 26 May 2014 at 1:58pm |
|
Hey Lesberg
Are you sure you weren't a rat rodder in your former life??? I love seeing this stuff...I love the back ground in your photos too...lots of space out there in the country... MikeC
|
|
|
I am the squirrel....
|
|
|
|
|
LesBerg
Member
Joined: 09 Apr. 2014 Location: Athol, ID Status: Offline Points: 1554 |
Post Options
Thanks(0)
Quote Reply
Posted: 27 May 2014 at 4:29pm |
|
If I had more money, I'd be a rat rodder in this life
I found a Dodge car over at the wrecking yard with a 2.2 turbo in it. I'm hoping to get over there this weekend and grab it - it'll run a whopping $25. At those prices, even I can afford to experiment a little. I want to mock it up on my spare exhaust manifold and see what I can do to mount it and make all the connections without any sheet metal work. This is my parent's place. My mom has ten acres out on the prairie west of Athol, ID. There are some beautiful views from here, to be sure. We're looking for a place of our own at the moment. We left Boise a couple of years ago to help Mom and Dad take care of the place, as dad was in poor health. Dad passed last fall, and we're still trying to get the property into a condition where mom can mostly take care of it. Speaking of which, I need to get out and get the garden tilled... We're pushing our luck getting it done so late, but we were still having hard frosts as of last week. I need to till up and level part of the yard too, but I was hoping to pick up a disc harrow to pull behind the Willys for that. Those mountains in the background are just south of lake Pend Oreille (locally pronounced "Pond-o-ray"). My goal is to drive the CJ about thirty miles in behind the lake to Packsaddle Mountain by July.
Edited by LesBerg - 27 May 2014 at 4:37pm |
|
|
1948 CJ2A 157713 24" Stretch "Old Ironsides"
1st Armored Div 6th Infantry Reg 3rd Infantry Bn Headquarters Company #161 rubigo in quo speramus - "In Rust we Trust" |
|
|
|
|
LesBerg
Member
Joined: 09 Apr. 2014 Location: Athol, ID Status: Offline Points: 1554 |
Post Options
Thanks(0)
Quote Reply
Posted: 29 May 2014 at 1:58am |
|
I hit the wrecking yard in Spokane again today. picked up the Carter YF from the Chevy truck I mentioned. I also tripped across two more of the very same rims I found in the pictures above.
They don't look it, but the pale color in the pictures is pale blue. The pair I picked up today are mostly white. Also picked up a float from Northwest Military Vehicles, so we're running again. I'll be sticking the exhaust in tomorrow, weather permitting.
|
|
|
1948 CJ2A 157713 24" Stretch "Old Ironsides"
1st Armored Div 6th Infantry Reg 3rd Infantry Bn Headquarters Company #161 rubigo in quo speramus - "In Rust we Trust" |
|
|
|
|
Post Reply
|
Page <1234 12> |
| Tweet |
| Forum Jump | Forum Permissions You cannot post new topics in this forum You cannot reply to topics in this forum You cannot delete your posts in this forum You cannot edit your posts in this forum You cannot create polls in this forum You cannot vote in polls in this forum |


 Topic Options