


|
|
|
A little project update on Chug A Lug |
Post Reply 
|
Page <1 23456 141> |
| Author | |
LesBerg 
Member 

Joined: 09 Apr. 2014 Location: Athol, ID Status: Offline Points: 1554 |
 Post Options Post Options
") Thanks(0) Thanks(0)
 Quote Reply Quote Reply
 Posted: 22 Jan. 2015 at 5:21am Posted: 22 Jan. 2015 at 5:21am |
Edited by LesBerg - 22 Jan. 2015 at 5:23am |
|
|
1948 CJ2A 157713 24" Stretch "Old Ironsides"
1st Armored Div 6th Infantry Reg 3rd Infantry Bn Headquarters Company #161 rubigo in quo speramus - "In Rust we Trust" |
|
 |
|
|
Mark W.
Member

Sponsor Member Joined: 09 Nov. 2014 Location: Silverton, OR Status: Offline Points: 7982 |
Post Options
Thanks(0)
Quote Reply
Posted: 22 Jan. 2015 at 5:29am |
|
NICE I want to see that. Since Blower are belt driven and turbos by the exhaust gases not sure you will get the right whine. But you sure will get the right boost in power.
|
|
|
Chug A Lug
1948 2A Body Customized 1949 3A W/S 1957 CJ5 Frame Modified Late 50's 134L 9.25"clutch T90A D18 (1.25") D44/30 flanged E-Locker D25 5.38 Since 1962 |
|
|
|
|
Mark W.
Member
Sponsor Member Joined: 09 Nov. 2014 Location: Silverton, OR Status: Offline Points: 7982 |
Post Options
Thanks(0)
Quote Reply
Posted: 26 Jan. 2015 at 1:15am |
|
So I been up to my Bee Hind in finishing up the fancy Clutch/Brake pedal arm to the Clutch Pedal Shaft and the mount to the frame. I'm pretty happy with the way it all can out.
So here it is my new upgraded and modified factory Clutch and Brake shaft assembly. 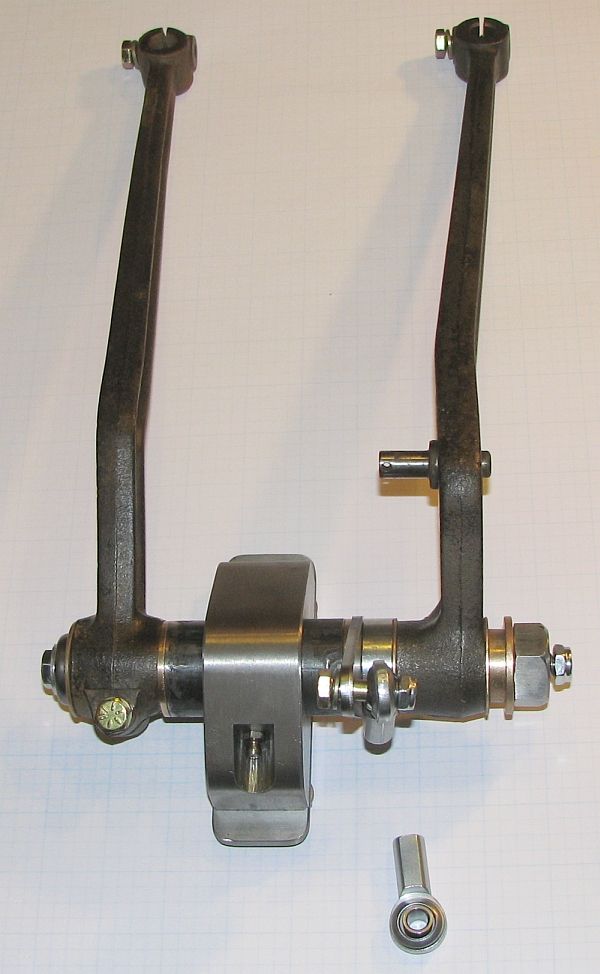  A little closer view of the assembly. This uses the Willys Factory Pedal Slop fix kit (thats the long bolt running through the center of the assembly and the cupped washer and the hollow adjustment nut followed by the Nylon insert Jam/locking nut) I have done away with the cotter pins and the steel washers. All wear surfaces and pivot points are Bronze Oilite Bearings. And all are serviced by a Gease Zerk. 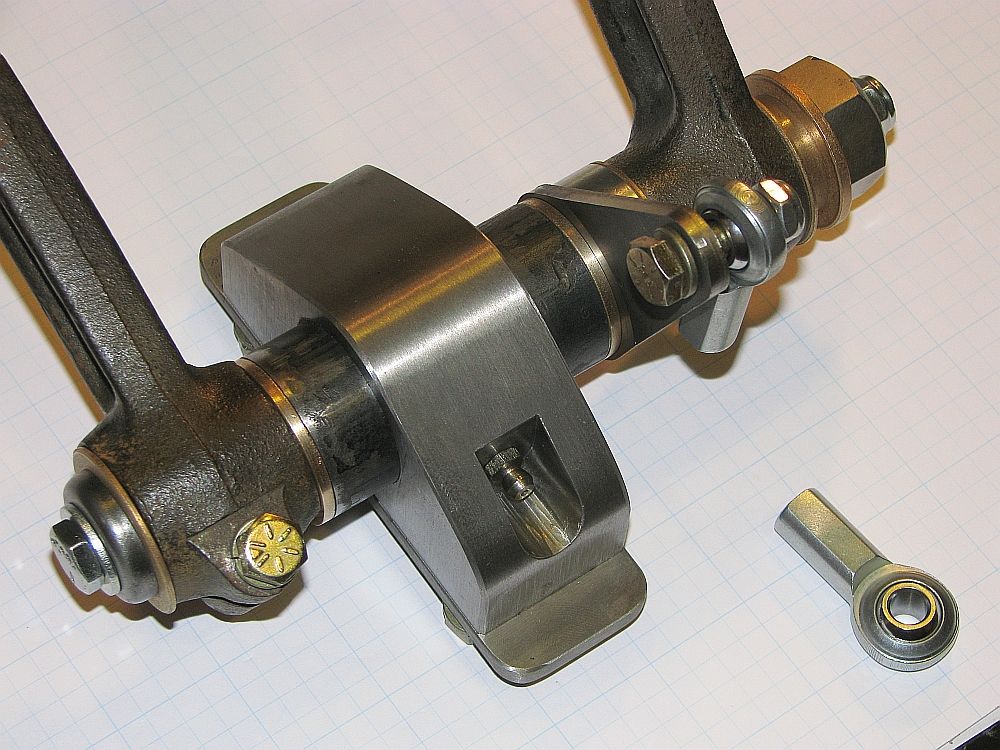 Just a view from the other side 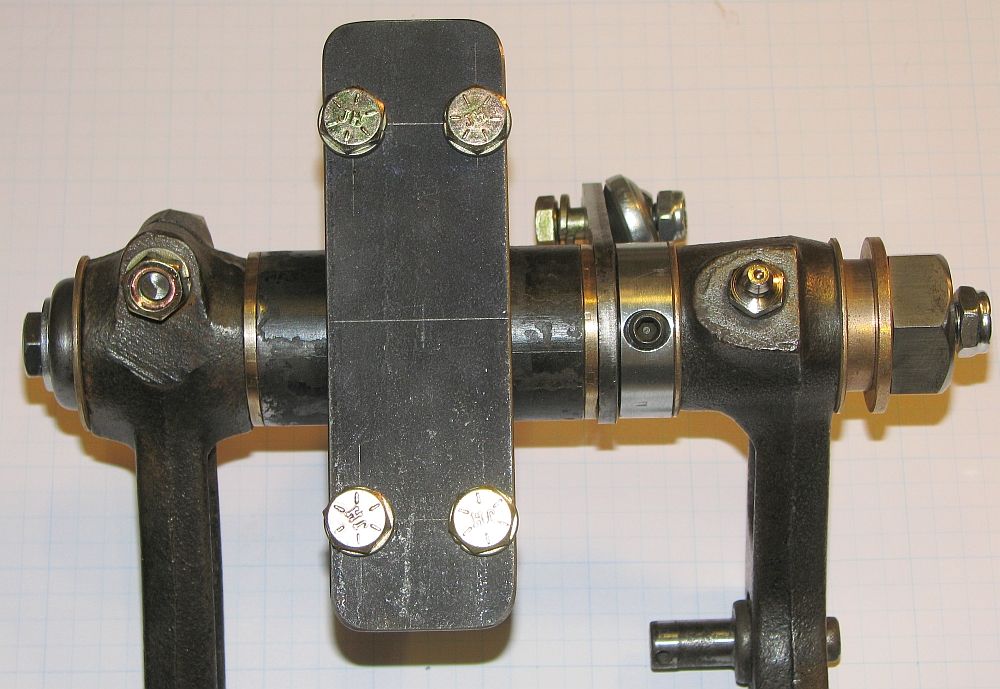 Bottom view ? Well actually this will be the view from the top when installed. The Mount attaches with 4) G8 5/16"-18T bolts cut to fit the application. You can see the spacer I made from a 7/8" ID x 1 1/2" OD shaft collar. It was just easier to start from the Collar then to make one from scratch on the lathe. But it worked out real well allowing me to lock the collar to the shaft and keeping it from rotating and causing wear. The space you see to the right of the Brake Pedal arm is where the brace will attach between the shaft assembly and the master cylinder mount. I'm going to be making this from 1/4" T stock and I bought some 10-32T tiny grease zerks so it can be serviced. 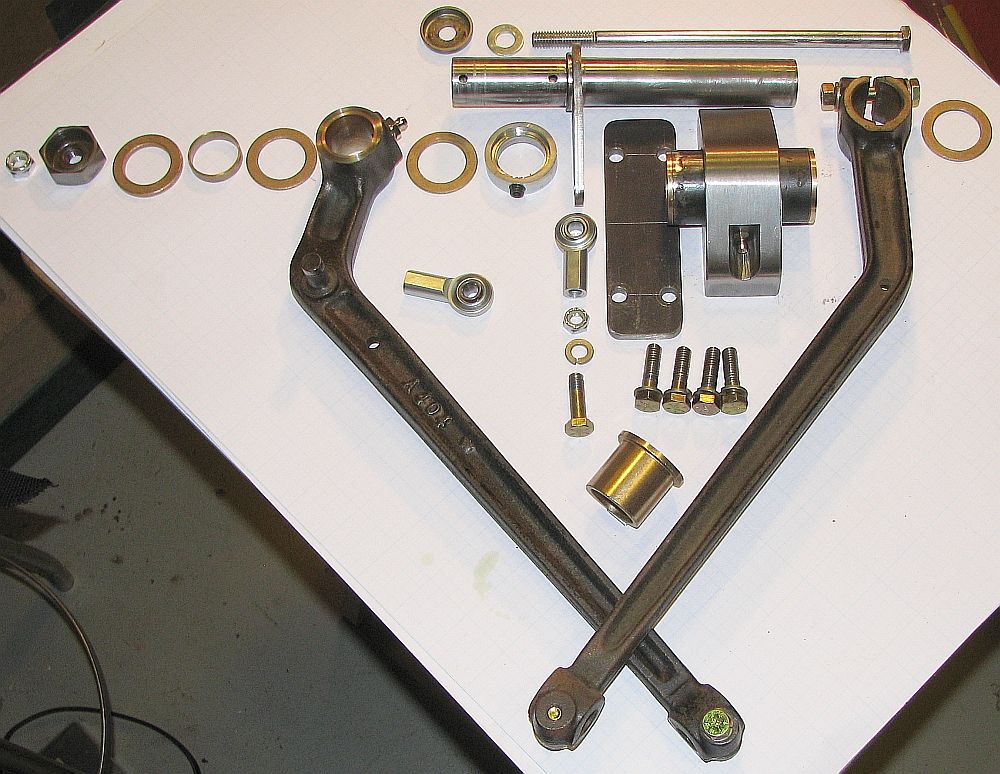 OK here is everything laid out. From the left 3/8"-16T Nylon insert Lock nut Cupped threaded adjustment Nut for the Willys Pedal Slop Fix Kit .125"T X 1.00" ID X 1.50" OD Thrust Bearing .250" W X 1.00" ID X 1.125" OD Bronze Bushing .065"T X 1.00" ID X 1.50" OD Thrust Bearing Brake Pedal Arm with 1.00" ID X 1.25" OD Bronze Bearing Pressed into the Arm. Then faced off. .065"T X 1.00" ID X 1.50" OD Thrust Bearing Special Shaft collar made with a set cut inside to allow room for weld line on Clutch Lever Next would come the Clutch Lever mounted on the Clutch Shaft (show in the above line) Clutch Shaft Assembly to Frame mount Bronze 1" ID x 1 1/4" OD w/ 1/8" T x 1 1/2" Flange OD Tube made from 1.5" x 2.75" 1020 Cold Rolled shaft material Bored to an ID of 1.250" Bronze bushings were then Pressed in place. Once assembled the ends of the Tube were faced off square with the Bore. Bronze 1" ID x 1 1/4" OD w/ 1/8" T x 1 1/2" Flange OD Once the Tube was assembled and the base of the Mount was roughed out. I took to press the Tube Assembly into the Mount. I guessed as to exactly what the interference fit would be (could have taken a .001 to .002" off the tube and been safe). I placed the Tube in the Freezer. Once it was as cold as it was going to get I put everything in my large bench vise and started pushing the Tube into place. I got about 3/8" in of the 2" it needed to travel to end up centered. then out came the propane torch and more reefing on the vise. And it got to the point I was tightening the vise ASAP and then wacking the vise with a hammer to shock it into moving. Much like you would break free a gear puller. This got me to about 5/8" from done. When the Vise came off the bench (not to worry it did that once before about 15 years ago) So I resigned myself to have to take it up to the shop at work tomorrow and press it in with the big Hydraulic press.. Wife screams for dinner/Eat dinner Great Idea. I assemble a reverse gear puller using some of the parts from my Milling machine hold down set. And with it sitting in the vise (now clamped to the bench) and using 2" 18" box end wenches I managed to get it almost perfect. BUT WHAT A PITA. I need a small press. 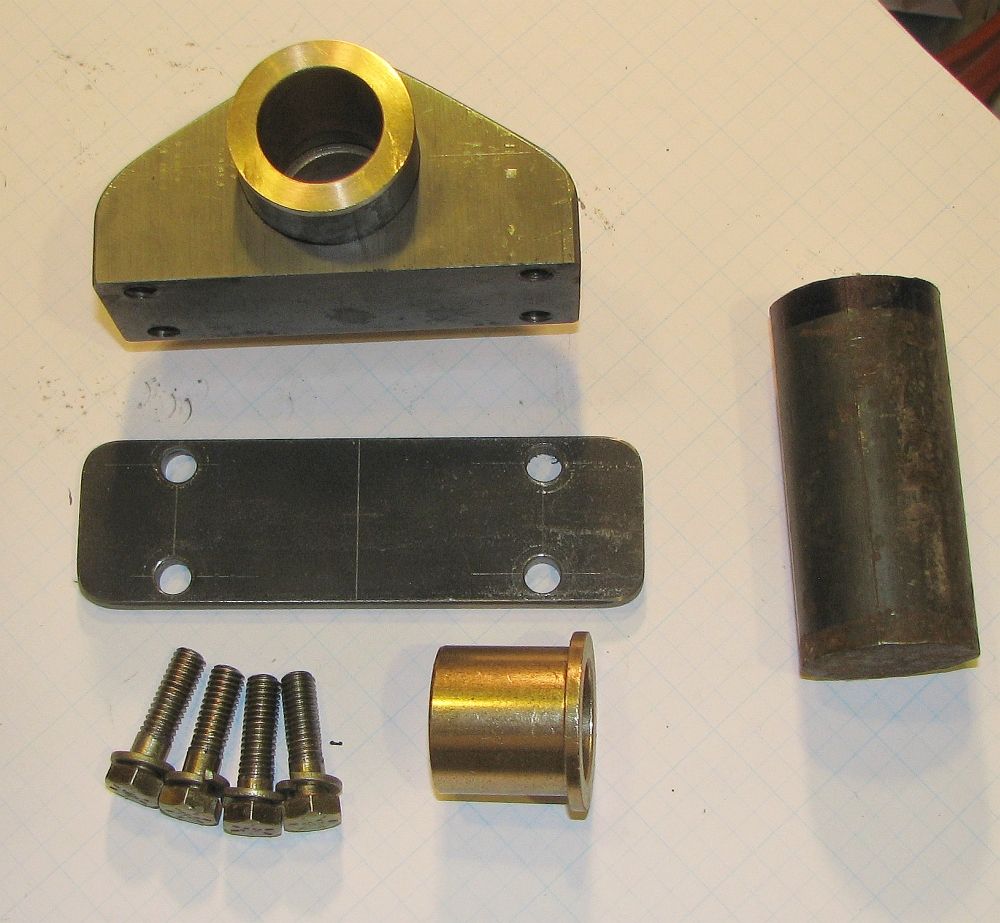 Some detail on the Mount section showing one of the Bronze bushings and a piece of the shaft material. The actual base is made from a piece of 1.5" x 2" x 4" 1020 Cold rolled Steel I had. 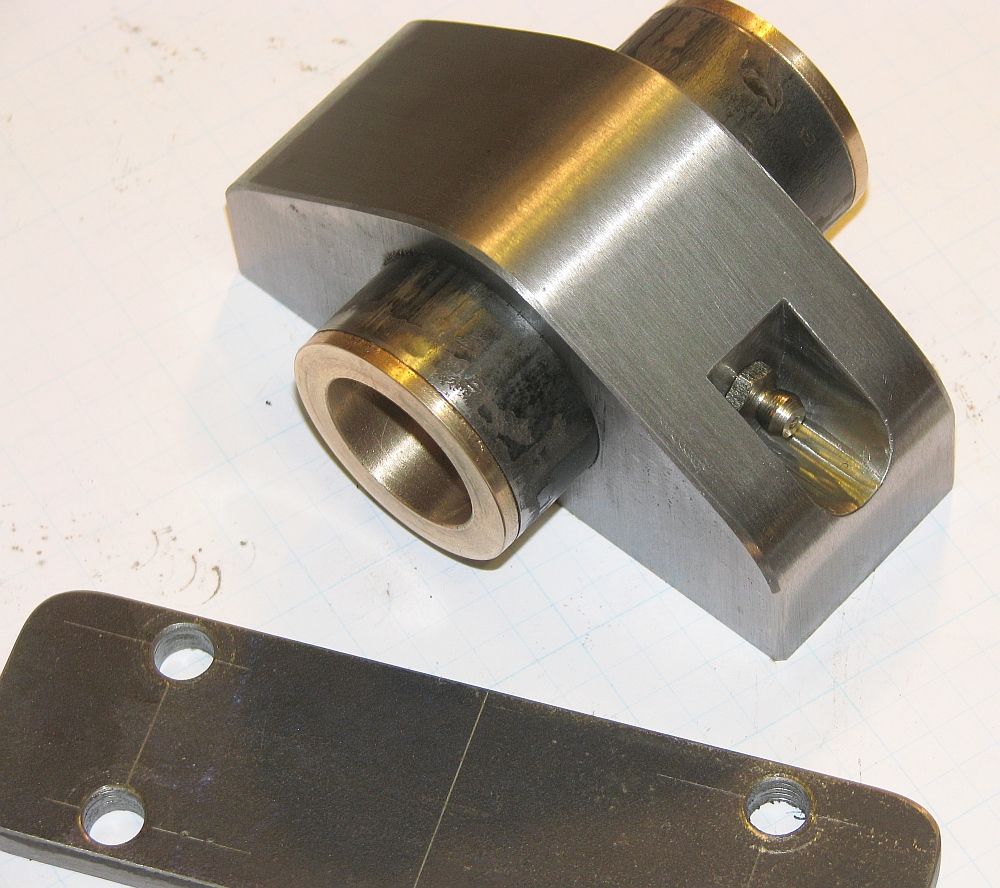 Details showing the protected grease zerk and the backing plate that will go inside the frame. The backing plate which will get welded to the frame. OK back to the progression down the assembly. Clutch Pedal Arm .065"T X 1.00" ID X 1.50" OD Thrust Bearing Following seen on the upper line. Cupped Steel Washer from Willys Factory Slop Fix Kit Steel 3/8" ID washer 3/8"-16T X 8" bolt with the head slightly thinned. Attached to the Clutch Lever is one of the two Rod ends that will make up the Clutch Push Rod. There you have it 4+ days of work I enjoy over engineering things. Next thing like this is the Steering Box mount (525 Manual Saginaw Box) and the brace for it. Edited by Mark W. - 26 Jan. 2015 at 1:17am |
|
|
Chug A Lug
1948 2A Body Customized 1949 3A W/S 1957 CJ5 Frame Modified Late 50's 134L 9.25"clutch T90A D18 (1.25") D44/30 flanged E-Locker D25 5.38 Since 1962 |
|
|
|
|
berettajeep
Member

Sponsor Member Joined: 03 Feb. 2009 Location: Astoria OR Status: Offline Points: 4304 |
Post Options
Thanks(0)
Quote Reply
Posted: 26 Jan. 2015 at 1:41am |
|
Wow! That looks really good!
 |
|
|
|
|
Mike S
Member
Joined: 20 May 2006 Location: West Coast Status: Offline Points: 2318 |
Post Options
Thanks(0)
Quote Reply
Posted: 26 Jan. 2015 at 2:46am |
|
Looks nice, Mark. Can I order one?
|
|
|
'47 CJ2A -- #114542
Warn FF D41 rear Lock-Right locker 11" drum brakes Dual master cylinder T90C Transmission 16 X 6 Jeep truck wheels Cooper STT Pro tires |
|
|
|
|
Mark W.
Member
Sponsor Member Joined: 09 Nov. 2014 Location: Silverton, OR Status: Offline Points: 7982 |
Post Options
Thanks(0)
Quote Reply
Posted: 26 Jan. 2015 at 2:58am |
|
I'm not sure I could make a profit LOL.
I have some drawings and I might make up a how to thread on it later. The killer to DIY this is having the tooling. Even if you had the lathe and mill. |
|
|
Chug A Lug
1948 2A Body Customized 1949 3A W/S 1957 CJ5 Frame Modified Late 50's 134L 9.25"clutch T90A D18 (1.25") D44/30 flanged E-Locker D25 5.38 Since 1962 |
|
|
|
|
rocnroll
Member
Sponsor Member Joined: 20 July 2005 Location: Tuscumbia, AL Status: Online Points: 13585 |
Post Options
Thanks(0)
Quote Reply
Posted: 26 Jan. 2015 at 3:41am |
Mike. though not as nicely machined as Mark's example here is an alternative if you are needing a heavy duty one......it's what M38s come stock with.
This one is on 'that' auction site but they show up at most swap meets.
 |
|
|
'47 CJ2A PU
'48 CJ2A Lefty "Common sense is not that common" |
|
|
|
|
Mark W.
Member
Sponsor Member Joined: 09 Nov. 2014 Location: Silverton, OR Status: Offline Points: 7982 |
Post Options
Thanks(0)
Quote Reply
Posted: 30 Jan. 2015 at 5:44am |
|
A little update (its been a while) SO I talked to the guy handling my engine rebuild and who's rebuilding my gear boxes. AND I'm pretty happy to find out the Gear boxes are all done. He ended up replacing everything but a shaft and the reverse idler gear in the T90 so that will basically be a new tranny. And the 1.25" transfer case he swapped me into is also almost new inside (he already had that one on the shelf when we made the big deal to trade my extra parts for his labor. The total bill comes in at $427.00 for the two gear boxes (nicely under my $500.00 budget)
And he's picking up my engine from the machinist either Sat or Mon depending on when he has the time. Its been off being computer spin balanced. Crank pulley to Pressure plate. And it looks as if the bill on the engine is going to well within the budget I had hoped. SO next week I run up North and pickup some pretty parts and a couple gear boxes ready to go after a good scrubbing and some paint. I have been working on a mount for the Dual Master Cylinder conversion it combines a much heavier mount with an integral heat and rock shield. When I have it done and can test out how all the mechanics work I'll do up some corrected drawings and post the drawings and a bunch of photos. Should have that all in place (temporarily anyway) sometime this weekend. I want to get it all installed and fix anything I don't like before I take it all apart and paint up the pieces. Then it will have to warm a shelf until I get the Steering box mount figured out and can get everything welded and then off to the Sand blasters. I'm going to paint the frame with POR-15 then before it dries I'll spray a Lt Gray primer into it and then once that's setup I'll spray everything with Sherwin Williams Chassis Black. The POR-15 I have is like 20 years old but the company told me that if its still liquid and I can mix it up with a stick it should be good to go! Great I was worried about loosing that investment. Not to mention how much the crap costs now! I'm hoping to have enough to do the frame in one can then the other can I have I'll use on the underside of the tub. OK back this weekend with some photos showing the new clutch shaft assembly and the new master cylinder setup mounted to the frame. |
|
|
Chug A Lug
1948 2A Body Customized 1949 3A W/S 1957 CJ5 Frame Modified Late 50's 134L 9.25"clutch T90A D18 (1.25") D44/30 flanged E-Locker D25 5.38 Since 1962 |
|
|
|
|
Mark W.
Member
Sponsor Member Joined: 09 Nov. 2014 Location: Silverton, OR Status: Offline Points: 7982 |
Post Options
Thanks(0)
Quote Reply
Posted: 01 Feb. 2015 at 11:40pm |
|
Some Quick Photos of the New Master Cylinder Mount. Its not quite done still the bracket that goes from the mount to the pedal shaft to make (waiting for the layout fluid to dry on the steel so I can scribe it out) and I have to drill another hole for the little bracket between the mount and the upper frame rail. I had to change some things after my first design following measurements from a store bought bracket put the MC way to close to the pedal shaft for my idea of ideal geometry (I know the store bought brackets have to deal with the Ross Steering box I do not since I am going with Saginaw Steering)
I now have the pushrod almost perfectly lined up both horizontal and vertical to piston in the MC. I may build a new pushrod using a Rod end and a Threaded rod because now the MC has more stroke then the original pushrood was designed for and part of the adjustment collar actually enters the MC when the pedal arm is fully depressed. I'm also going to make a little pedal stop to make sure the pedal arm can't hit the top of the MC. Like when bleeding the brakes or something. I have 5" of pedal travel and can't imagine that I will need any more then that. I double checked and I can bottom out the MC while keeping the pedal arm just 1/8" off the top of the MC. I guess I'll find out when I start assembling the chassis and can actually test the brakes. And then when the floor is in place I can proof the pedal arm position. Once finished I'll pull everything apart sandblast all the parts and give them a good painting with etching primer and chassis black. All the bolts once they are cut to length and all the nuts and washers will go into a baggie waiting for the frame to be finished. And I get to start a final assembly. One of the few things I learned from all those drama queen hot rod shows on TV is to completely build the custom stuff then take it apart, paint it and reassemble it. Rather then just blast paint all over the various assembles. That way no hidden areas are unprotected and you make your mistakes before you end up screwing up the paint job. 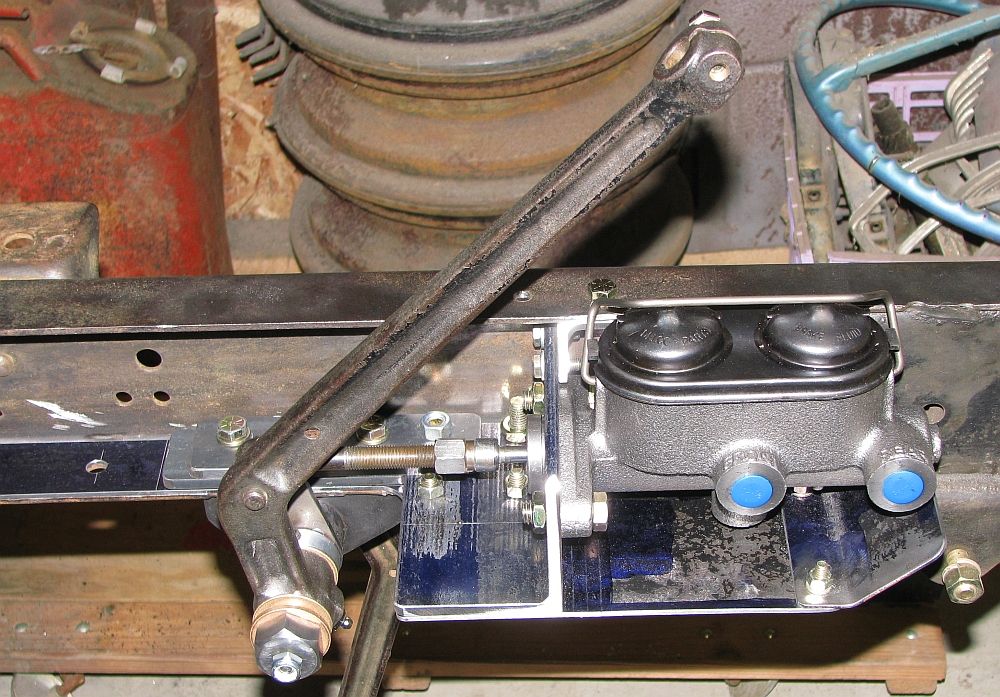 This is a CJ5 frame so its different as to how the tranny cross member mounts. On the inside of the frame there was a .100" doubler spot welded on. I removed that and replaced it with the part that becomes the heat shield. The stack of 1/4" piece you see are to level things out because of wanting to tie the MC bracket to one of the Pedal Shaft Mount bolts. 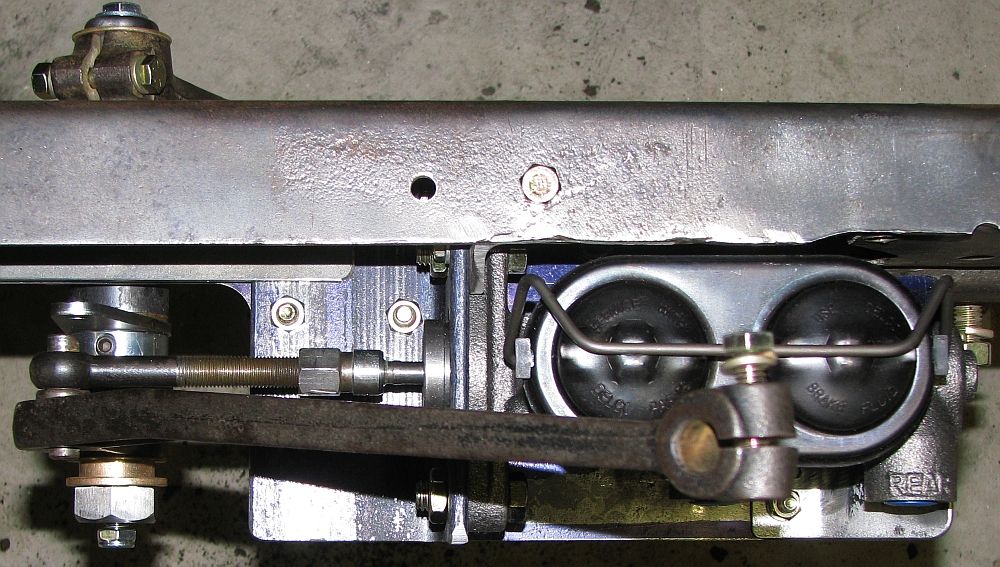 In this photo you can see the horizontal alignment of the pushrod as well as the master cylinders distance from the frame rail (about 1/4") no need to grind into the frame rail. 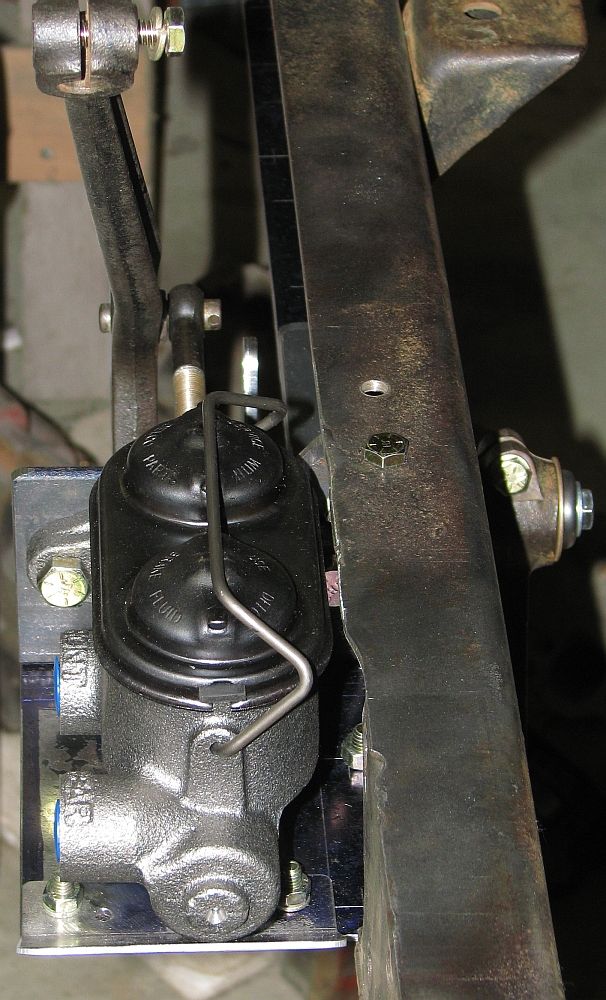 Front view of the gap between the MC and the frame. 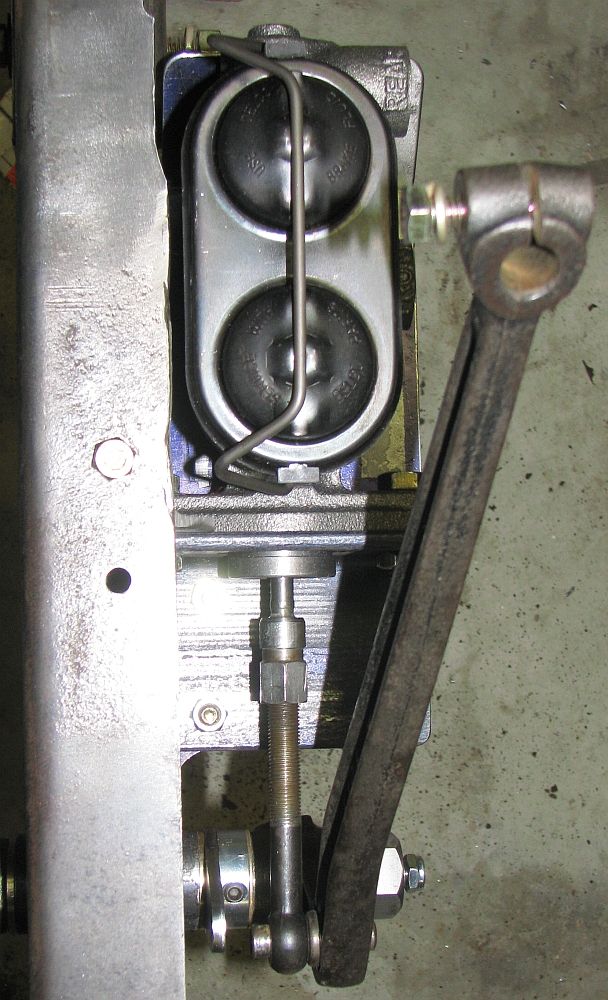 Vertical view 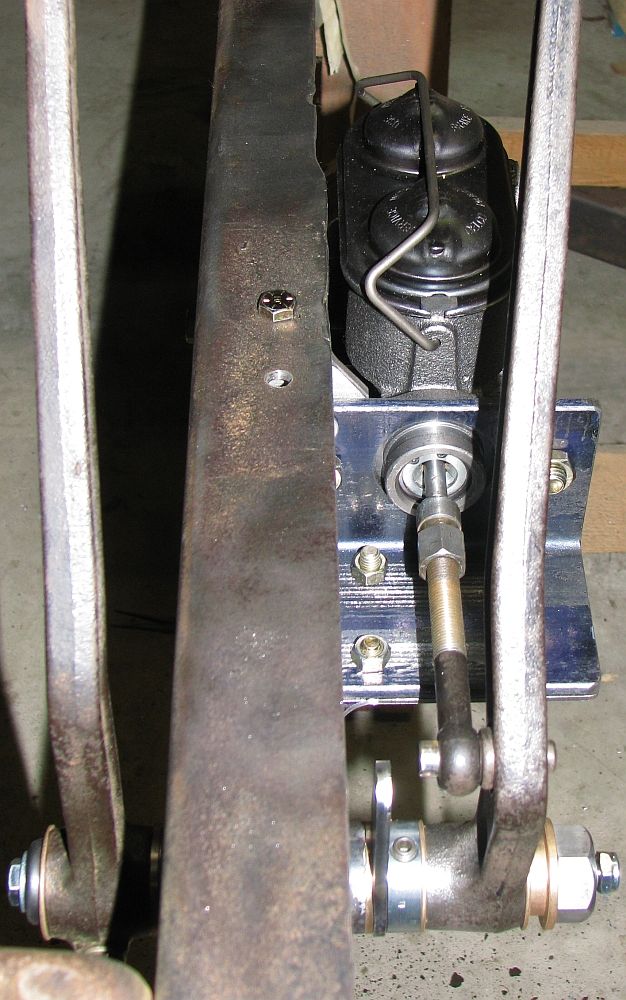 Rear View 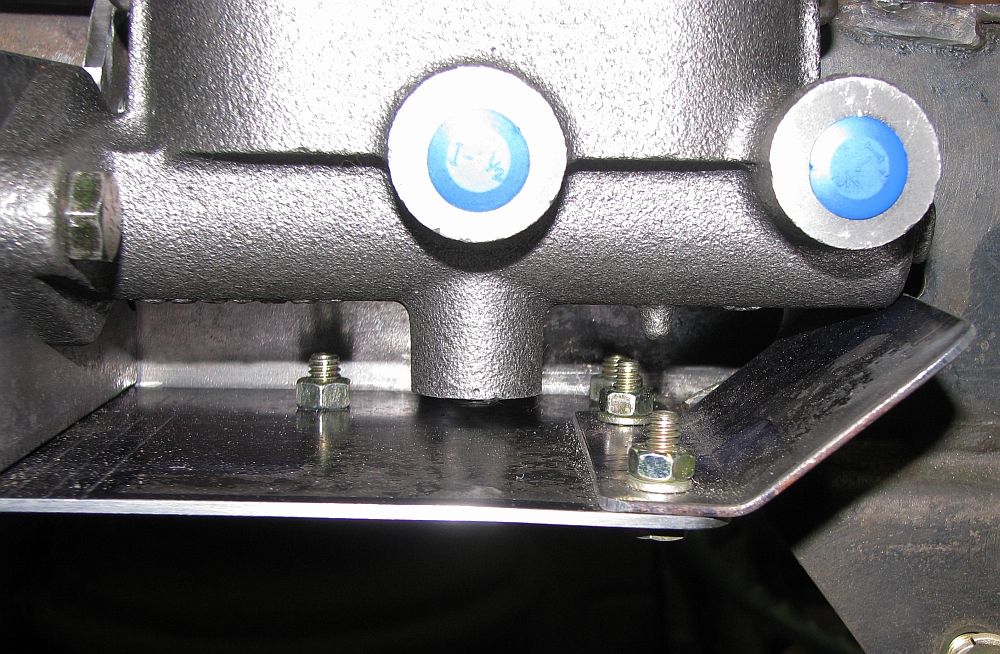 View under the MC and the edge of the heat shield. Had I not had to change the design after I built the first bracket moving the MC 1.5" farther away from the Pedal Shaft the 45 degree section of the heat shield would have been an integral part of the shield. But moving it exposed the front of the MC to direct exhaust heat so this is the fix I came up with. 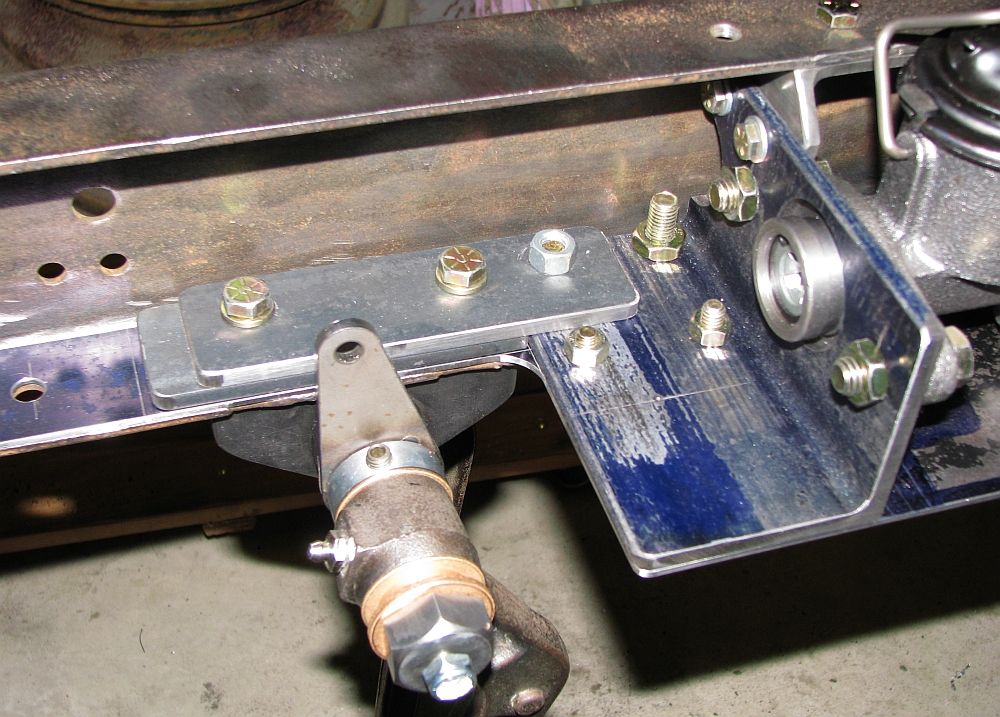 Detail showing how its all bolted together. While I did the majority of the work over top of the frame I have made sure that without to much cussing and screaming I can take everything back part from under the jeep so servicing the MC when it comes time shouldn't be a problem. So I'll add a couple more photos to this series once the bracket to the Pedal shaft is done and I have all the proper nuts and bolts in place. I'm seriously thinking about drilling a few 1/8"D registration pin holes while its all aligned and to make it a little easier to reassemble. I would drill the holes and ream them to exactly 1/8" and use some drill rod pins I have to hold the parts in place while the nuts and bolts are tightened. OK back to the shop I'm sure the Layout fluid is dry by now. Edited by Mark W. - 02 Feb. 2015 at 7:25pm |
|
|
Chug A Lug
1948 2A Body Customized 1949 3A W/S 1957 CJ5 Frame Modified Late 50's 134L 9.25"clutch T90A D18 (1.25") D44/30 flanged E-Locker D25 5.38 Since 1962 |
|
|
|
|
Mark W.
Member
Sponsor Member Joined: 09 Nov. 2014 Location: Silverton, OR Status: Offline Points: 7982 |
Post Options
Thanks(0)
Quote Reply
Posted: 02 Feb. 2015 at 6:05am |
|
OK super quick update. I got the little pedal shaft brace/bracket finished. Pretty weird shaped thing to make from a piece of angle iron. When I went to bore the 1.125" holes in it to hold the bushing. I couldn't find that stupid large hole spade bit I made the other day anywhere. So I cut down a short lathe bit and mounted it in the large hole mandrel and used it like a boring bar. Worked a treat as my mom would say. The bushing pressed in with just the right amount of tension. I drilled the #21 hole to thread with a 10-32 tap for the tiny grease zerk I got so even it will be serviceable.
And then I went to clamp it in place to double check everything before I drilled the holes to mount it. AND IT WAS BINDING THE PEDAL SHAFT just a tiny amount but enough that with the close tolerances I have on everything I couldn't move the Clutch lever without serious effort. So I took a close look to see where and how it was causing it to bind up and saw that if I ground the base of the brace/bracket at a very slight angle (hey them 14 years I spent making my living making hand made knives paid off I'm real good at free hand grinding flat angles LOL) I could get it to mount up and not bind. So 30 min of fiddling around and that problem was solved. OK here's the last photos on this until after they are painted and reassembled on the painted frame. 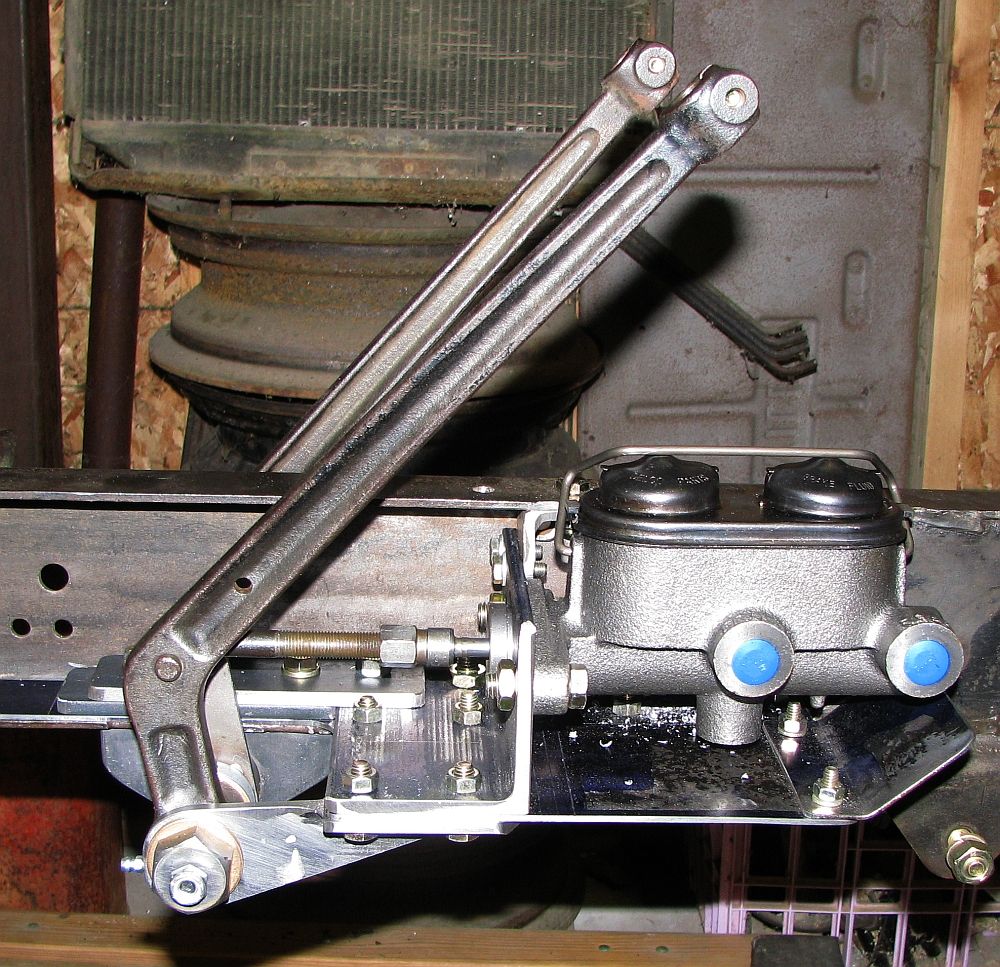 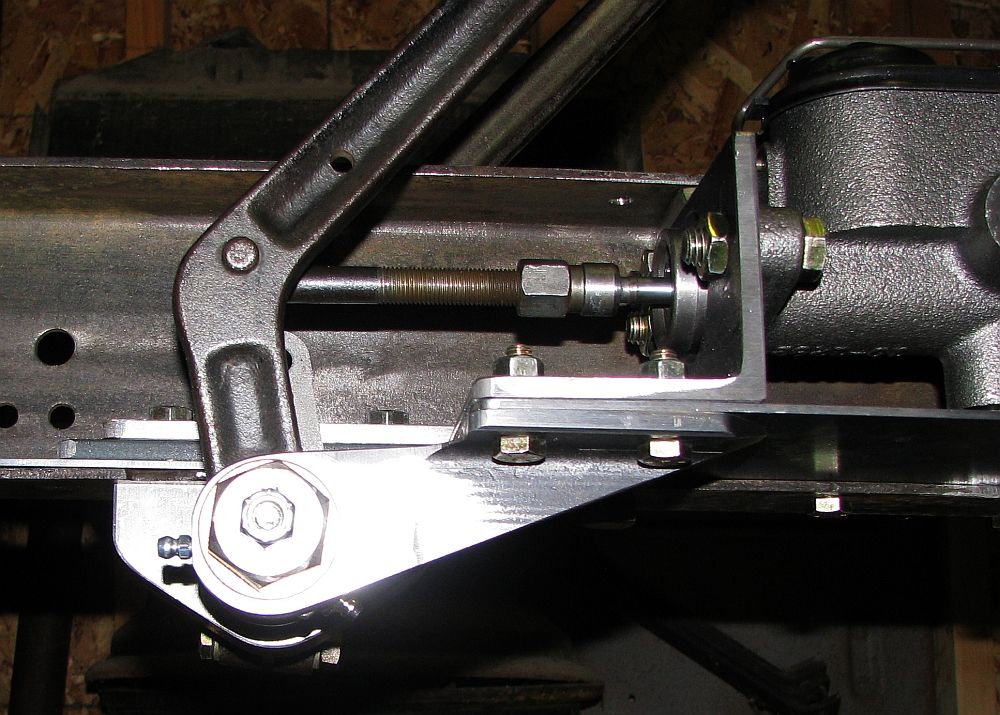 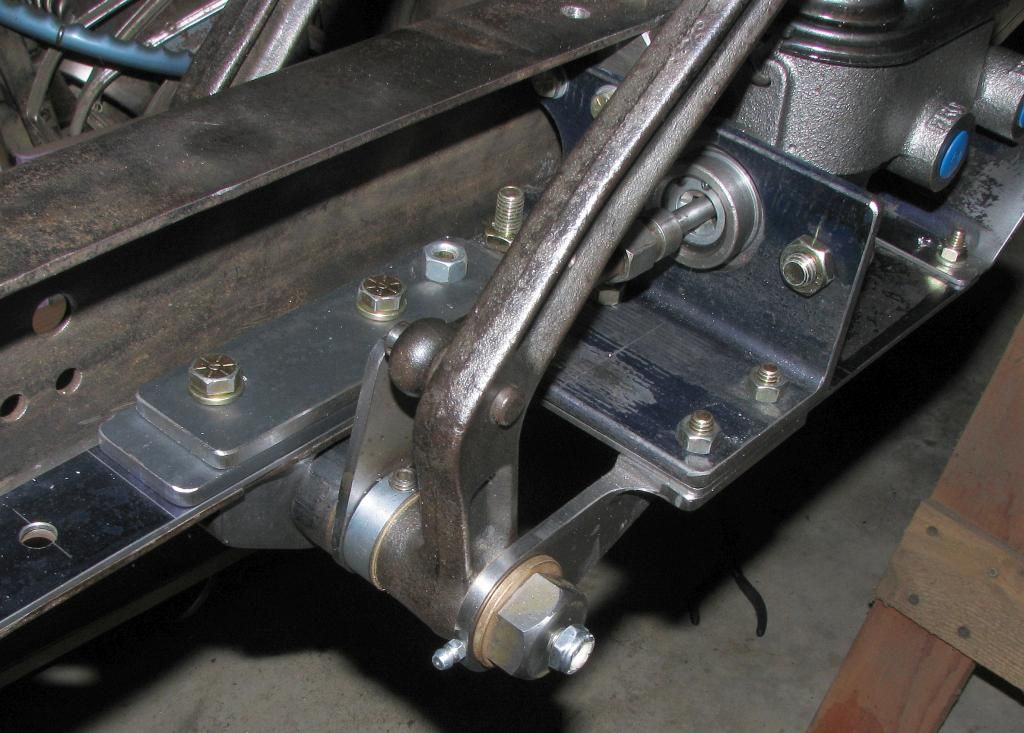 But tonight I am pretty happy with how it turned out. Sure the OCD anal retentive nut who over engineers everything inside me thinks just one more version and it could be so perfect. Luckily the guy who wants to drive this thing before I'm dead has over ruled him and one more day is all it gets then into the sand blaster and Paint. Edited by Mark W. - 03 Feb. 2015 at 6:39am |
|
|
Chug A Lug
1948 2A Body Customized 1949 3A W/S 1957 CJ5 Frame Modified Late 50's 134L 9.25"clutch T90A D18 (1.25") D44/30 flanged E-Locker D25 5.38 Since 1962 |
|
|
|
|
Mark W.
Member
Sponsor Member Joined: 09 Nov. 2014 Location: Silverton, OR Status: Offline Points: 7982 |
Post Options
Thanks(0)
Quote Reply
Posted: 02 Feb. 2015 at 9:48pm |
|
So I get the call the engine machine work and both gear boxes are ready to be picked up. The gear boxes are almost completely new inside. The engine is honed to fit the pistons, hard seats, crank and rods ground .010 under, Computer Spin Balanced. I still need to buy bearings and the gaskets/seals.
I should have some photos in a couple days. both excited and a little scared. |
|
|
Chug A Lug
1948 2A Body Customized 1949 3A W/S 1957 CJ5 Frame Modified Late 50's 134L 9.25"clutch T90A D18 (1.25") D44/30 flanged E-Locker D25 5.38 Since 1962 |
|
|
|
|
54willysjeep
Member

Joined: 14 Nov. 2014 Location: Santa Ana CA Status: Offline Points: 155 |
Post Options
Thanks(0)
Quote Reply
Posted: 03 Feb. 2015 at 2:52am |
|
where can you find the WILLYs pedal slop kit? or did you make it?
|
|
|
54 Willys CJ3B (Rikki-Bobby's Jeep)
42 GPW14359 Cal "Shake n' Bake's Jeep" Dallas TX plant. Missing everything when I got it. |
|
|
|
|
Mark W.
Member
Sponsor Member Joined: 09 Nov. 2014 Location: Silverton, OR Status: Offline Points: 7982 |
Post Options
Thanks(0)
Quote Reply
Posted: 03 Feb. 2015 at 5:24am |
|
I found it on my Willys. Dad must have had it put on in the 60's he was good friends with the Jeep dealerships mechanic in Salem. And the Jeep club he was a charter member of had its meetings in the shop at the dealership. So I would assume a lot of things like the Pedal slop kit was well known among his running buddies at the time.
The only thing that would need to be made is the big adjustment nut. And that could easily be done on a lathe from some Octagon shaped stock. You can buy small amounts of that from an on line metal dealer like "on line metals" or "speedy metals" The cupped washed on the other end could be made from round stock. the bolt is a hardware store 3/8"-16T x 8" grade 5 bolt. If you want to try making the two pieces I can post some drawings of their dimensions tomorrow. |
|
|
Chug A Lug
1948 2A Body Customized 1949 3A W/S 1957 CJ5 Frame Modified Late 50's 134L 9.25"clutch T90A D18 (1.25") D44/30 flanged E-Locker D25 5.38 Since 1962 |
|
|
|
|
54willysjeep
Member
Joined: 14 Nov. 2014 Location: Santa Ana CA Status: Offline Points: 155 |
Post Options
Thanks(0)
Quote Reply
Posted: 04 Feb. 2015 at 1:20am |
that was my thinking as well that big adjustment nut would have to be made from something. I don't have a lathe at home but at work I do. I would like to make a couple of those. I found something online about it and I have it bookmarked on my tablet. I would like to know the dimensions of it so I can find the stuff. I may have some octagonal stock at work. What I find funny is that no one is making these to sell. I'm sure there are plenty of people who own jeeps that would love to have one on their jeep. I would appreciate the dimensions of the two pieces.
|
|
|
54 Willys CJ3B (Rikki-Bobby's Jeep)
42 GPW14359 Cal "Shake n' Bake's Jeep" Dallas TX plant. Missing everything when I got it. |
|
|
|
|
Mark W.
Member
Sponsor Member Joined: 09 Nov. 2014 Location: Silverton, OR Status: Offline Points: 7982 |
Post Options
Thanks(0)
Quote Reply
Posted: 04 Feb. 2015 at 3:16am |
|
I will PM them to you ASAP
|
|
|
Chug A Lug
1948 2A Body Customized 1949 3A W/S 1957 CJ5 Frame Modified Late 50's 134L 9.25"clutch T90A D18 (1.25") D44/30 flanged E-Locker D25 5.38 Since 1962 |
|
|
|
|
Mark W.
Member
Sponsor Member Joined: 09 Nov. 2014 Location: Silverton, OR Status: Offline Points: 7982 |
Post Options
Thanks(0)
Quote Reply
Posted: 05 Feb. 2015 at 12:05am |
|
WOWZER WOWZER I got me an engine and two beautiful gear boxes.
The Engine has been all machined and is ready to reassemble and scrub up and paint. Since I know all of you want to know what was done. Cleaned, Inspected, and Magnafluxed Blocked bored .060" over final lapped to the pistons Decked .007" Installed 8 Hardened valve seats Valves ground and lapped R&R Valve guides installed new R&R Cam bearing new soft plugs installed New oil galley plugs installed Rods reconditioned Installed pistons on rods Crank Checked and polished (it was already .010" under and needed no regrind) Head surfaced .035" Complete rotating assembly from pulley to pressure plate balanced I will be doing the reassembly of the engine with all new parts including an NOS Willys camshaft and NOS Tappets New Timing gears Oil Pump etc. On the Gear boxes virtually the whole interior of the T-90 is new (he reused the reverse Idler) The 1.25" D-18 he swapped me for my 1.125" D-18 going from 26T to 29T he put a set of real nice used gears and a complete kit. So both boxes he says should out last me. If taken care of (which of course they will be) I had everything done by Washougal Classic Jeep in Washougal WA. I couldn't be happier with how Richard handled my engine and rebuilt my gear boxes. So at the point of a guy who just picked up his stuff I couldn't be happier. He's very good at what he does. I have seen his finished restoration work and its very nice. Anyone in the area would be ahead to talk to Richard if they need an Engine machined or (this is his specialty) Gear boxes rebuilt. www.washougalclassicjeep.com IMHO Now I have some stuff to work on LOL. Edited by Mark W. - 06 Feb. 2015 at 4:17am |
|
|
Chug A Lug
1948 2A Body Customized 1949 3A W/S 1957 CJ5 Frame Modified Late 50's 134L 9.25"clutch T90A D18 (1.25") D44/30 flanged E-Locker D25 5.38 Since 1962 |
|
|
|
|
Mike S
Member
Joined: 20 May 2006 Location: West Coast Status: Offline Points: 2318 |
Post Options
Thanks(0)
Quote Reply
Posted: 05 Feb. 2015 at 12:58am |
|
Rapid progress, Mark. Having fun, too!
|
|
|
'47 CJ2A -- #114542
Warn FF D41 rear Lock-Right locker 11" drum brakes Dual master cylinder T90C Transmission 16 X 6 Jeep truck wheels Cooper STT Pro tires |
|
|
|
|
Mark W.
Member
Sponsor Member Joined: 09 Nov. 2014 Location: Silverton, OR Status: Offline Points: 7982 |
Post Options
Thanks(0)
Quote Reply
Posted: 05 Feb. 2015 at 1:08am |
|
Well I gotta get as much done as possible during the winter with construction season about 6 weeks away once work starts we put in 60 hours a week and after wrestling the dump truck and pup for 8-12 hours a day I'm pretty tired. And the few days off always have something going on like Hiney do's so Winter is my project time.
|
|
|
Chug A Lug
1948 2A Body Customized 1949 3A W/S 1957 CJ5 Frame Modified Late 50's 134L 9.25"clutch T90A D18 (1.25") D44/30 flanged E-Locker D25 5.38 Since 1962 |
|
|
|
|
Post Reply
|
Page <1 23456 141> |
| Tweet |
| Forum Jump | Forum Permissions You cannot post new topics in this forum You cannot reply to topics in this forum You cannot delete your posts in this forum You cannot edit your posts in this forum You cannot create polls in this forum You cannot vote in polls in this forum |


 Topic Options
 Mark W. wrote: