


|
|
|
First time Willys owner, new project |
Post Reply 
|
Page <12345 12> |
| Author | |
LesBerg 
Member 

Joined: 09 Apr. 2014 Location: Athol, ID Status: Offline Points: 1554 |
 Post Options Post Options
") Thanks(0) Thanks(0)
 Quote Reply Quote Reply
 Posted: 29 May 2014 at 5:42am Posted: 29 May 2014 at 5:42am |
|
After trolling my favorite search engine, DuckDuckGo.com, looking for the turn signal switch I found, I was pointed right back to the theCJ2Apage forums:
Turns out the unit I found is a Spartan. Thanks Scott R, for helping me identify it!
|
|
|
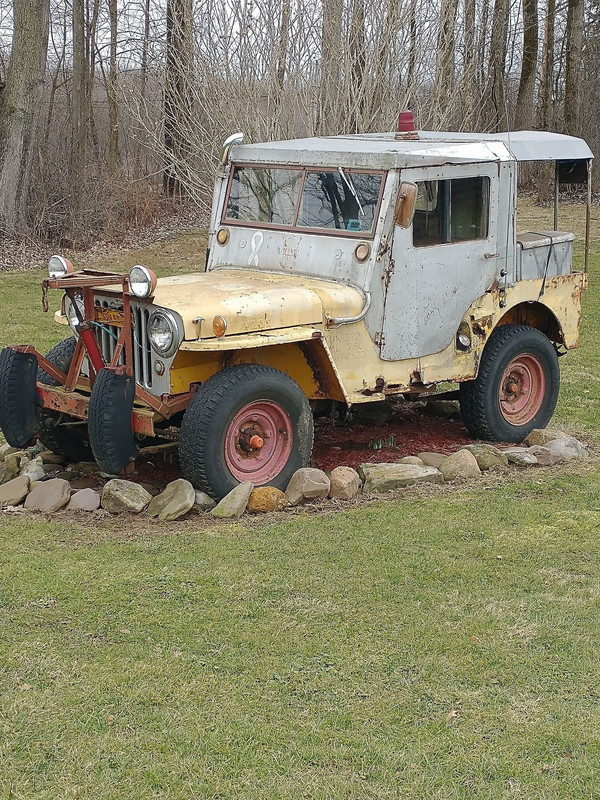
1948 CJ2A 157713 24" Stretch "Old Ironsides"
1st Armored Div 6th Infantry Reg 3rd Infantry Bn Headquarters Company #161 rubigo in quo speramus - "In Rust we Trust" |
|
 |
|
|
LesBerg
Member
Joined: 09 Apr. 2014 Location: Athol, ID Status: Offline Points: 1554 |
Post Options
Thanks(0)
Quote Reply
Posted: 01 June 2014 at 5:38am |
|
Made some new bolts for a pair of damaged early front marker housings Gary gave me. I'm going to bolt them to the frame rails in the rear-most hole in the bumper gussets for front turn signals. Just need lenses to pull it off. Lovely - I need the bezels too. probably means I'll just have to order complete units.
Still looking for ideas for the rear turn signals...
I just finished up replacing the exhaust manifold and got started installing the exhaust. There's a little more to do - I need to lengthen the pipe by 24" and it should be good. Oh - if you look here: you can read the drama of busting an exhaust stud off at the back of the block and finding that the left steering knuckle was toast - including the axle shaft. To recap it, I'm going to hold off on repairing the stud until I pull the tub for repairs later this year. Similarly, I'll wait to replace the axle shaft until we can afford it. I'll keep it in 2wd until I can replace it. Now for more drama.... I took it out on a quick test drive. I ran it around the perimeter of Mom's 10 acre property. We've been staying here for the last couple years helping her fix the place up. Anyway, after the 1/2 mile perimeter run in 4-low/1st, it started running rough. I couldn't see anything obviously wrong under the hood, so I hopped up on the road and ran it about a 1/4 mile in high range and took it back to the house. When I parked it and shut it down, it started puking coolant everywhere for several minutes. The radiator looks pretty rough, but it doesn't leak so I was hoping it would be OK. The temp gage is bad - the needle appears stuck up against the left side of the inside of the gage. I'm really hoping that this doesn't mean that it overheated so bad it stuck the gage sometime in the past... I'll pull and test the thermostat tomorrow sometime. I hope it's shot - I really can't afford a radiator too.
Edited by LesBerg - 01 June 2014 at 5:45am |
|
|
1948 CJ2A 157713 24" Stretch "Old Ironsides"
1st Armored Div 6th Infantry Reg 3rd Infantry Bn Headquarters Company #161 rubigo in quo speramus - "In Rust we Trust" |
|
|
|
|
gostby
Member
Joined: 05 Jan. 2013 Location: Lincoln WA Status: Offline Points: 334 |
Post Options
Thanks(0)
Quote Reply
Posted: 01 June 2014 at 6:05am |
|
Les, I think I have the lens for those lights. Let me know your address and I'll stick them in the mail. Gary
|
|
|
gostby
|
|
|
|
|
LesBerg
Member
Joined: 09 Apr. 2014 Location: Athol, ID Status: Offline Points: 1554 |
Post Options
Thanks(0)
Quote Reply
Posted: 01 June 2014 at 6:11am |
|
Gary, You're the man! PM inbound.
|
|
|
1948 CJ2A 157713 24" Stretch "Old Ironsides"
1st Armored Div 6th Infantry Reg 3rd Infantry Bn Headquarters Company #161 rubigo in quo speramus - "In Rust we Trust" |
|
|
|
|
mikec4193
Member
Joined: 23 May 2009 Location: Malta NY Status: Offline Points: 1161 |
Post Options
Thanks(0)
Quote Reply
Posted: 01 June 2014 at 7:40pm |
|
Hey Les
The radiators for these vehicles are crazy expensive...mine ran over $500.00 for a re-core from a local shop...I try to keep the money in the neighborhood...but if you cant find one there is this place here that I found...I am hoping this radiator comes from someone in this country.... https://www.radiatorexpress.com/product.asp?part_id=221423&aaia_id=1487043&gclid=CI-t6ryo2b4CFSMQ7AodTBcA6A Thinking you wont need a new radiator...but just in case...here is an option for you... MikeC
|
|
|
I am the squirrel....
|
|
|
|
|
LesBerg
Member
Joined: 09 Apr. 2014 Location: Athol, ID Status: Offline Points: 1554 |
Post Options
Thanks(0)
Quote Reply
Posted: 02 June 2014 at 4:33pm |
|
Yeah, I'm finding that this is the case for my 67 Ford truck as well. New radiator for it wil be nearly $700...
And I'm going to need a new one on the jeep. After overheating day before yesterday, it leaks pretty bad. There's enough previous damage that no shop around here is going to even attempt to patch it up. The shroud is also completely missing, so it's looking like a new one is on the horizon. I've been trying like mad to get it running by this Thursday at the latest. Not finished, mind you, just safe to drive and road legal. My son wants a ride to school in it on the last day, which is Friday. I don't think I'm going to pull it off, but I'm trying.
|
|
|
1948 CJ2A 157713 24" Stretch "Old Ironsides"
1st Armored Div 6th Infantry Reg 3rd Infantry Bn Headquarters Company #161 rubigo in quo speramus - "In Rust we Trust" |
|
|
|
|
LesBerg
Member
Joined: 09 Apr. 2014 Location: Athol, ID Status: Offline Points: 1554 |
Post Options
Thanks(0)
Quote Reply
Posted: 05 June 2014 at 7:10am |
|
OK. Much closer to having it road-ready for Friday morning.
I replaced the thermostat, it was bad. Radiator leaks are down to minor seepage. It should last well enough until I can afford a good, solid replacement. Here's a picture of the left Bendix joint - definitely needs to be replaced - as mentioned, it's on the marker board. 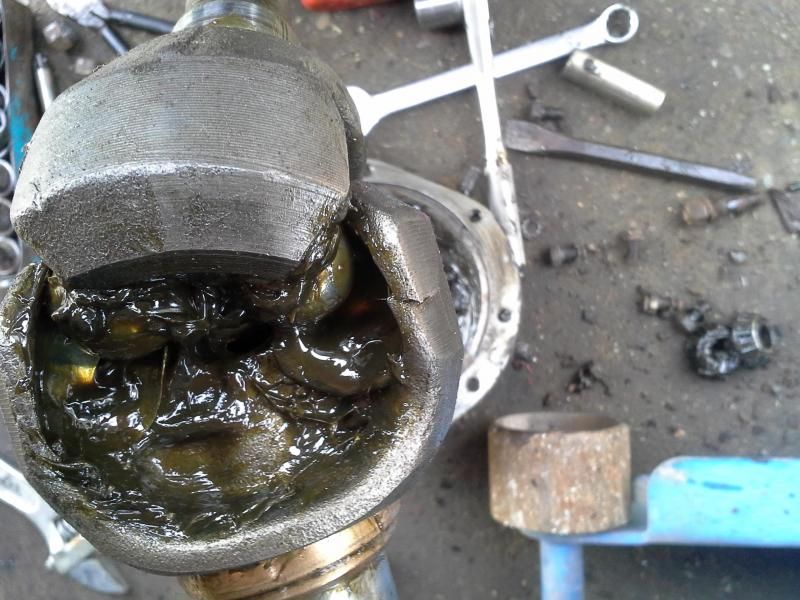 I mentioned that Gary donated a bunch of parts to the cause, including a pair of early front parking light housings. I had to fab a bracket for the socket and a pair of mounting bolts. The bracket was just a standard mild steel corner brace, and I drilled an appropriate sized hole through a pair of 5/16 carriage bolts: 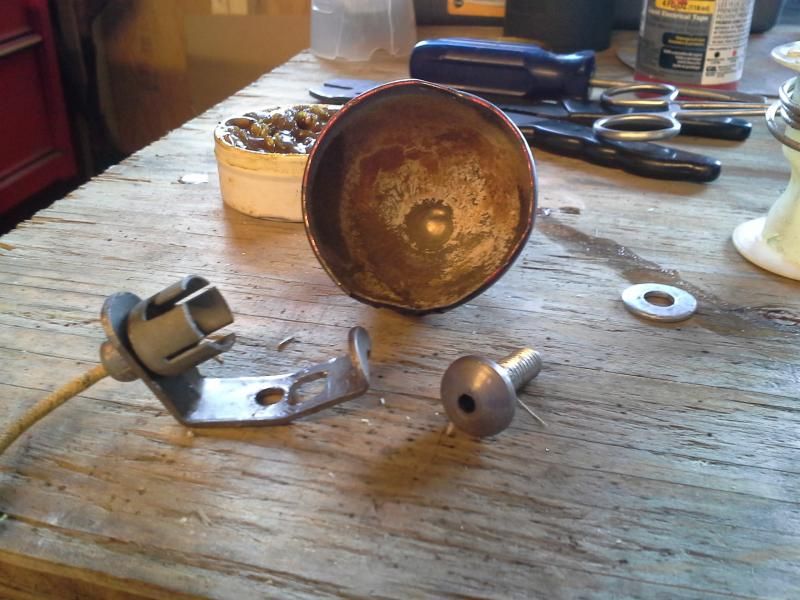 I mounted them on the front frame horns, as planned. I got everything wired up and tested. The rear turn signals are small amber LED marker l;ights. They're temporary - I haven't found anything I'm happy with, and my vintage Spartan turn signal unit is a four-wire, which requires separate turn signals. It doesn't tie into the brake lights. 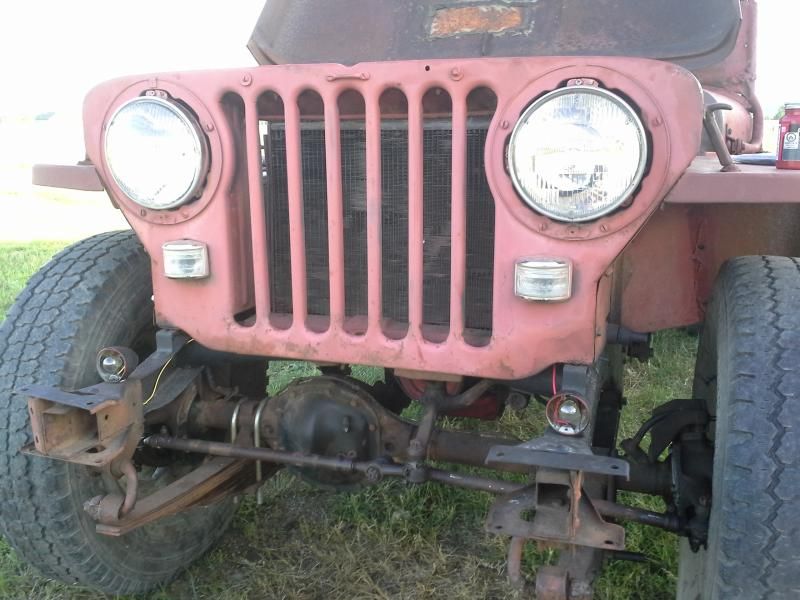 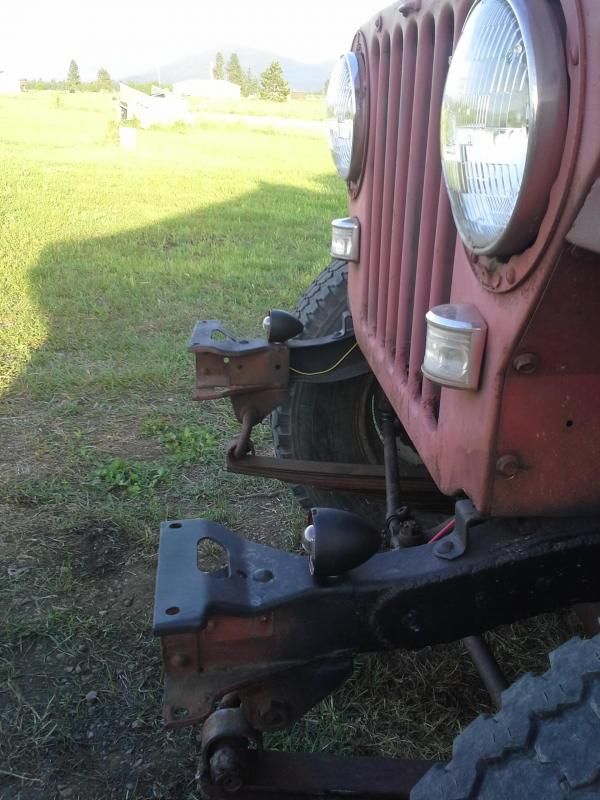 Oh, I also installed a complete, correct PCV system and a new RH outer tie rod, then did a by-the-manual front end alignment. The front end is now solid and stable. And I shot the rims in flat black. I couldn't stand having a blotchy primer jeep with a red primer rim, a green/black rim, and a pair of white ones... And then because I couldn't help myself, I shot a rattle can coat of primer on the body. It helps me see where I've got body work to do. |
|
|
1948 CJ2A 157713 24" Stretch "Old Ironsides"
1st Armored Div 6th Infantry Reg 3rd Infantry Bn Headquarters Company #161 rubigo in quo speramus - "In Rust we Trust" |
|
|
|
|
LesBerg
Member
Joined: 09 Apr. 2014 Location: Athol, ID Status: Offline Points: 1554 |
Post Options
Thanks(0)
Quote Reply
Posted: 05 June 2014 at 7:14am |
|
I have to say that I enjoy body work. But I'm dreading tackling the hood. It's wavy and warped enough to make Captain Ahab turn green. Someone had the brilliant idea to braze the center seam closed, but did a bad enough job that it took a yard of bondo to hide it...
No, it's really that bad. I'll post pictures, but have a paper bag ready in case your stomach rebels...
|
|
|
1948 CJ2A 157713 24" Stretch "Old Ironsides"
1st Armored Div 6th Infantry Reg 3rd Infantry Bn Headquarters Company #161 rubigo in quo speramus - "In Rust we Trust" |
|
|
|
|
gostby
Member
Joined: 05 Jan. 2013 Location: Lincoln WA Status: Offline Points: 334 |
Post Options
Thanks(1)
Quote Reply
Posted: 05 June 2014 at 5:07pm |
|
Les, some bad news. I can't find the rims or lens. Must have found their way into the garbage can.
|
|
|
gostby
|
|
|
|
|
LesBerg
Member
Joined: 09 Apr. 2014 Location: Athol, ID Status: Offline Points: 1554 |
Post Options
Thanks(0)
Quote Reply
Posted: 05 June 2014 at 9:47pm |
That's OK. Thanks for checking, I appreciate it. I'm thrilled that the parts gave me the inspiration on how to do the front turn signals.
|
|
|
1948 CJ2A 157713 24" Stretch "Old Ironsides"
1st Armored Div 6th Infantry Reg 3rd Infantry Bn Headquarters Company #161 rubigo in quo speramus - "In Rust we Trust" |
|
|
|
|
otto
Member

Joined: 26 Feb. 2012 Location: Orygun Status: Offline Points: 2264 |
Post Options
Thanks(0)
Quote Reply
Posted: 06 June 2014 at 2:50am |
I have a hood that is in the same condition after I tried welding up a large hole someone cut into it; I'm still working on it.
|
|
|
47 CJ2A w/fuel injected boat engine
48 CJ2A 64 Ford Econoline Travelwagon If you can't get there in a Jeep, get a motorcycle! |
|
|
|
|
LesBerg
Member
Joined: 09 Apr. 2014 Location: Athol, ID Status: Offline Points: 1554 |
Post Options
Thanks(0)
Quote Reply
Posted: 06 June 2014 at 5:14am |
|
Yeah, this one has that issue as well. My thought is that I certainly can't make it very much worse, and I can get a lot of practice in with my slap and vixen files... I think of it as a good warm-up to starting on flat body panels.
And with any luck, I end up not needing to drop $500 on a new hood. 
This is another good time to make the case for buying an oxy-acetylene torch [edit] The instructor I had for my collision repair course could do some wild stuff with a torch and metal-working tools. He could have had my hood 'straight and relieved' in about an hour. The only person I've ever seen pull off more spectacular metal 'magic' was the instructor that he replaced a decade earlier. He was invited back once a every cycle to give a bondo-less metal working 'workshop'. I brought in a fender from my 63 Fairlane 500, which had been shortened about an inch in a front end collision. Watching him work the buckle out and bring all the body lines back into place... I don't even know how to describe it. Absolutely magic.
Edited by LesBerg - 06 June 2014 at 5:38am |
|
|
1948 CJ2A 157713 24" Stretch "Old Ironsides"
1st Armored Div 6th Infantry Reg 3rd Infantry Bn Headquarters Company #161 rubigo in quo speramus - "In Rust we Trust" |
|
|
|
|
zooke581
Member
Joined: 18 Feb. 2013 Location: Pilot, VA Status: Offline Points: 871 |
Post Options
Thanks(0)
Quote Reply
Posted: 06 June 2014 at 5:46am |
|
Your work is looking good. As for waves and such, on my Mil Jeep I like a few waves. I have never been a perfect restorer anyway. I have had an Oldsmobile from each year 1954 to 1959 and one 1958 Buick.
|
|
|
General William C. Lee Chapter of the 101st Airborne Division Association. B Btry 1/321 FA 76-78
http://va101stairborne.com http://sundialmotosports.com http://kalamals.com |
|
|
|
|
otto
Member
Joined: 26 Feb. 2012 Location: Orygun Status: Offline Points: 2264 |
Post Options
Thanks(0)
Quote Reply
Posted: 06 June 2014 at 3:36pm |
|
The instructors I had for auto body repair were older gents at the time (early 1980s) and real metal men. I did get the hang of metal finishing and working metal, but it's been a loooong time since doing any of it.
|
|
|
47 CJ2A w/fuel injected boat engine
48 CJ2A 64 Ford Econoline Travelwagon If you can't get there in a Jeep, get a motorcycle! |
|
|
|
|
LesBerg
Member
Joined: 09 Apr. 2014 Location: Athol, ID Status: Offline Points: 1554 |
Post Options
Thanks(0)
Quote Reply
Posted: 06 June 2014 at 6:10pm |
|
I love metal finishing. When you can take a mangled piece of metal and work it to the point you don't need filler or glaze, there's a real sense of accomplishment.
Here are a few pics of the hood First, the underside. Note the size and depth of the dent surrounding the patched hole: 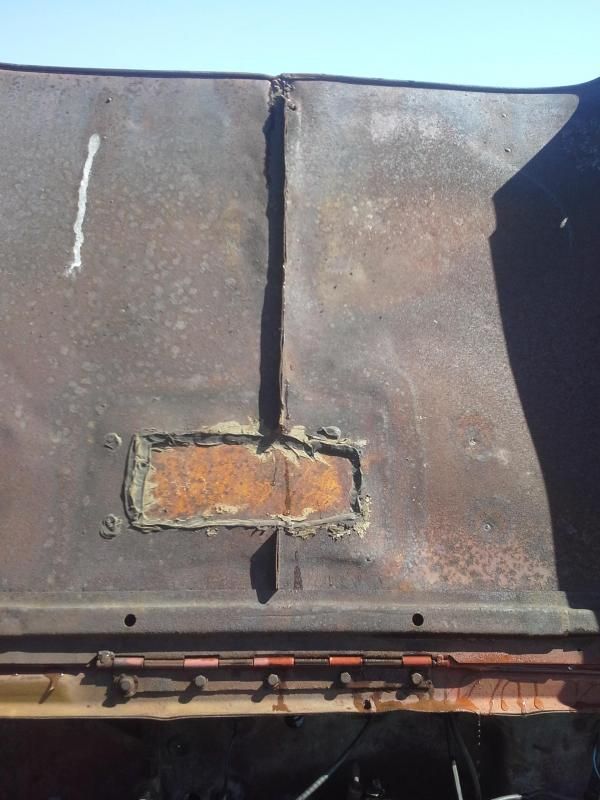 On the driver's side, closest to the windshield, that 'recess' is almost a half inch deep. On the top, the seam has been brazed over. I'll have to take this in to have it melted out, I don't have an oxy-acetylene torch. 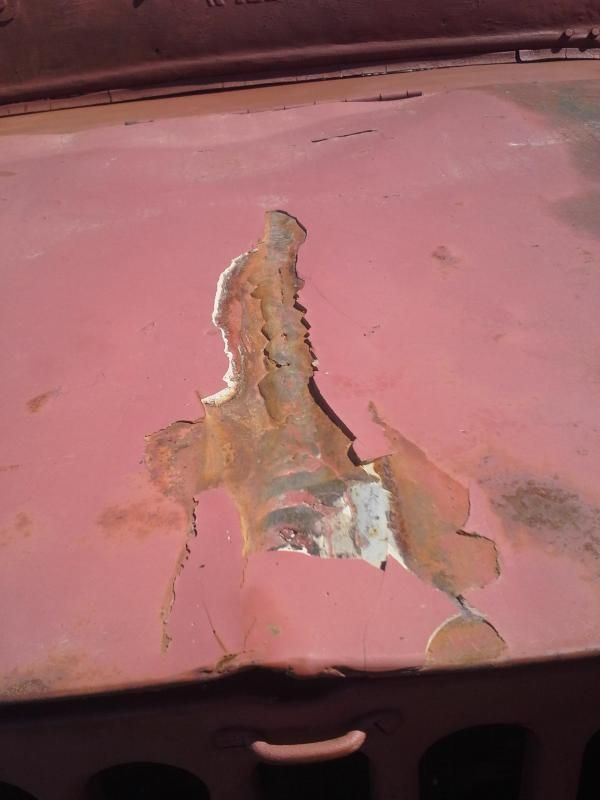 Get your paper bags ready, I wet down the hood to highlight the waves: 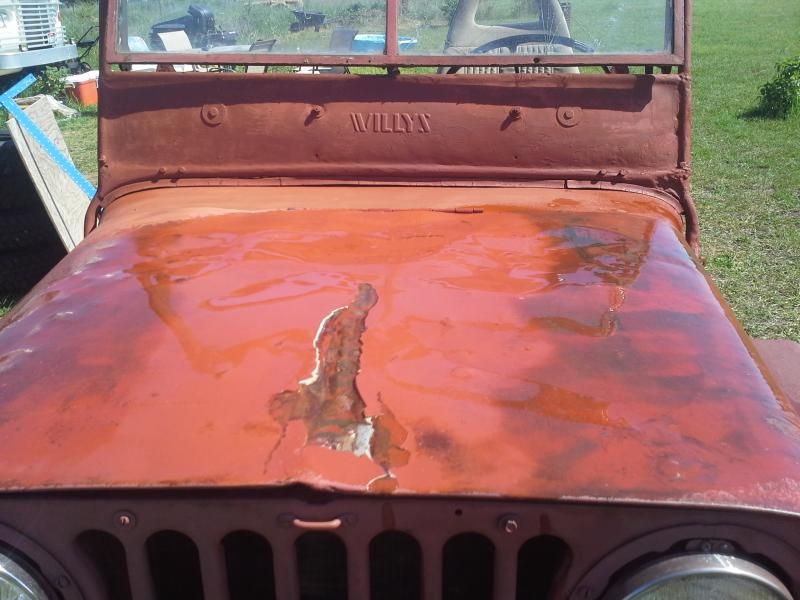 I'm really wishing I had a sandblaster right now.... [edit] While I'm wishing, I might as well add a metal brake and a tubing bender..
Edited by LesBerg - 06 June 2014 at 6:12pm |
|
|
1948 CJ2A 157713 24" Stretch "Old Ironsides"
1st Armored Div 6th Infantry Reg 3rd Infantry Bn Headquarters Company #161 rubigo in quo speramus - "In Rust we Trust" |
|
|
|
|
otto
Member
Joined: 26 Feb. 2012 Location: Orygun Status: Offline Points: 2264 |
Post Options
Thanks(0)
Quote Reply
Posted: 06 June 2014 at 7:41pm |
|
That is one messed up hood! On the other hand my jeep's hood looked like that after patching the hole in it. I'm still working on it, I've gotten the driver's half looking much better. The passenger's side is still putting up a fight. It's on my list of things to do this weekend.
|
|
|
47 CJ2A w/fuel injected boat engine
48 CJ2A 64 Ford Econoline Travelwagon If you can't get there in a Jeep, get a motorcycle! |
|
|
|
|
minnow1193
Member
Joined: 11 June 2014 Location: Tampa FL Status: Offline Points: 209 |
Post Options
Thanks(0)
Quote Reply
Posted: 11 June 2014 at 3:03am |
|
Hi. I just joined and I quickly scanned through this thread and didn't see (or missed) any comments about your odd wheelbase.
If it is ~24" longer than the stock 80" of a jeep, it could be a wagon frame. They have a 104" wheelbase. Just a thought that may help you find parts etc..... Good looking project so far. Keep at it. Steve |
|
|
|
|
LesBerg
Member
Joined: 09 Apr. 2014 Location: Athol, ID Status: Offline Points: 1554 |
Post Options
Thanks(0)
Quote Reply
Posted: 11 June 2014 at 5:53am |
|
Thanks!
I promise you it's a CJ2A frame though. It's properly tagged for a CJ2A and it's pretty easy to pick out where the work was done. Best I can figure is that it was stretched using a kit of some kind. The tub was stretched on a zig-zag line between the back of the door well and the front of the wheel well, and the frame was spliced right between the trans crossmember and the rear body mount. All the seams are readily apparent, and the quality of the parts is better than the quality of the install, which is why I think it was a kit. I'd rate the quality of the work as "better than shade tree, not quite modern collision repair". Given the technology and expertise of body shops of the day, this could easily rank as either a budget professional job or a very well executed garage project. Thanks for the info, though.
|
|
|
1948 CJ2A 157713 24" Stretch "Old Ironsides"
1st Armored Div 6th Infantry Reg 3rd Infantry Bn Headquarters Company #161 rubigo in quo speramus - "In Rust we Trust" |
|
|
|
|
Post Reply
|
Page <12345 12> |
| Tweet |
| Forum Jump | Forum Permissions You cannot post new topics in this forum You cannot reply to topics in this forum You cannot delete your posts in this forum You cannot edit your posts in this forum You cannot create polls in this forum You cannot vote in polls in this forum |


 Topic Options
 gostby wrote: