|
|
|
floor chanel replacement |
Post Reply 
|
| Author | |
harry E 
Member 
Joined: 23 Nov. 2013 Location: Johnstown, NY Status: Offline Points: 137 |
 Post Options Post Options
") Thanks(0) Thanks(0)
 Quote Reply Quote Reply
 Topic: floor chanel replacement Topic: floor chanel replacementPosted: 12 Feb. 2019 at 12:36am |
|
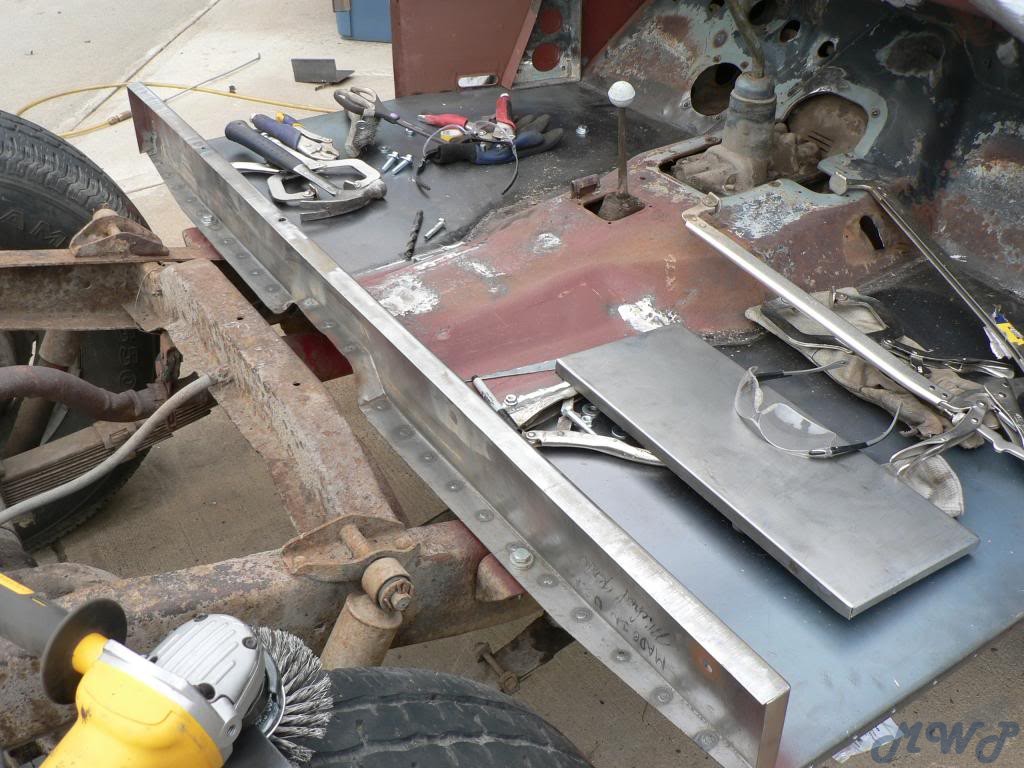
I am going to be changing the hat channels under the floor on my tub. Also some of the floor on both sides. my tub is a old reproduction tub and is in good shape. I am planning to lift the body half to three quarts of an inch. I had some channels made a half inch taller than the original's. Body work is not my favorite part of this project . Every thing seems to be fairly straight forward so my questions are is there any do's or do not's when replacing these parts. it usually is easer to here about others mistakes before screwing things up without asking first.
thanks for any advice Harry E     
|
|
|
Harry Eisenhauer
|
|
 |
|
|
berettajeep
Member

Sponsor Member Joined: 03 Feb. 2009 Location: Astoria OR Status: Offline Points: 4304 |
Post Options
Thanks(0)
Quote Reply
Posted: 12 Feb. 2019 at 12:42am |
|
Don't weld the channels completely to the floor to avoid warping the floor ( Like I did
 ) ) I would put anti crush sleeves where you plan to put bolt through to attach to tub. |
|
|
|
|
harry E
Member
Joined: 23 Nov. 2013 Location: Johnstown, NY Status: Offline Points: 137 |
Post Options
Thanks(0)
Quote Reply
Posted: 12 Feb. 2019 at 12:59am |
|
I was planning to drill holes in the flange that contacts the floor about every inch and mig weld through the holes. I have already warped some stuff with the welder. trying to go very slow at it.
|
|
|
Harry Eisenhauer
|
|
|
|
|
JohnB
Member

Sponsor Member Joined: 01 June 2014 Location: Saint Louis, MO Status: Offline Points: 393 |
Post Options
Thanks(0)
Quote Reply
Posted: 12 Feb. 2019 at 2:40am |
|
When I installed new hat channels, I had good luck using a flanger/hole punch tool from HF. Worked well for me doing plug-welds.
|
|
|
|
|
Rus Curtis
Member
Joined: 25 Mar. 2010 Location: Alabama Status: Offline Points: 1733 |
Post Options
Thanks(0)
Quote Reply
Posted: 12 Feb. 2019 at 3:43am |
|
Suggest attaching hat channels to the frame. Drill holes through floor pan and weld to hat channel (probably require removing the tool box though). Better guarantee alignment with frame mounts.
My MDJuan floor pan was much thinner than the Classic Enterprises hat channels and the body guy said it would be much easier without risk of burning through the floor pan. Afterwards he just ground flat the welds. He didn't have access to my frame and the tub/mounts ended up 1/2" off, front to back. Slightly larger holes made it fit. X 2 on crush sleeves. Also consider a capture nut (no through-hole) under the fuel tank so nothing sticks up to rub on the tank.
|
|
|
Rus Curtis
Alabama 1954 CJ3B Bantam T3-C |
|
|
|
|
athawk11
Member

Joined: 18 Jan. 2012 Location: Arvada,Colorado Status: Offline Points: 4151 |
Post Options
Thanks(0)
Quote Reply
Posted: 12 Feb. 2019 at 4:57am |
|
X2 what Russ suggests. It's a good idea to use the frame to align the channels so they mount up right. All assemblies are a bit different, but I bolted the channel pieces to the frame, then tacked them together as a complete assembly. I completed the channel welding, then bolted them back on the frame. I essentially rebuilt the tub on top of the channels while they were bolted to the frame. In my case, this assured the tub would mount aligned and straight on the frame. It is a lot more steps to do it this way, but I didn't want to take the chance that it wouldn't fit back tougher correctly.
|
|
|
1- 1946 CJ2A
2- 1949 CJ3A |
|
|
|
|
taf1
Member
Joined: 21 Sep. 2020 Location: Van Etten, NY Status: Offline Points: 8 |
Post Options
Thanks(0)
Quote Reply
Posted: 23 Feb. 2021 at 10:07pm |
|
Where did you buy the hat channel?
|
|
|
|
|
taf1
Member
Joined: 21 Sep. 2020 Location: Van Etten, NY Status: Offline Points: 8 |
Post Options
Thanks(0)
Quote Reply
Posted: 23 Feb. 2021 at 10:10pm |
|
Fitzie's Fabrications youtube on welding sheet meta: https://www.youtube.com/watch?v=qScAlxb34UA
He shows how to avoid warping sheet metal while welding.
|
|
|
|
|
SlaterDoc
Member

Joined: 03 Mar. 2020 Location: Catskills, NY Status: Offline Points: 222 |
Post Options
Thanks(0)
Quote Reply
Posted: 24 Feb. 2021 at 6:09am |
|
metalshaper has a good video also on plug welding the hat channels! X2 on the HF flanging/punch tool. Drilling the holes leaves a raised burr that you need to grind down in order to get a tight seal between!
|
|
|
Once a Navy man, always a Navy man!
|
|
|
|
|
cjs cj
Member
Joined: 11 Oct. 2016 Location: Florida Status: Offline Points: 157 |
Post Options
Thanks(0)
Quote Reply
Posted: 25 Feb. 2021 at 2:00am |
|
I recently did this, I used the hat channels from Classic Enterprises. Good quality product, they had the mounting holes drilled and crush spacers already welded in place. So I lined up the fwd mounting holes to the firewall gussets and the bolt that goes threw the bracket by the steps. It worked out pretty well. I test fit this weekend and only the rear floor riser mounts were off a little all the hat channels bolts were good. I also used the Harbor freight punch tool, but had to return it twice. I would get about 10-15 holes punched and it would die. Had correct air press and oiled it, the flange side is about useless. Good luck.
 |
|
|
Cjs Cj
1948 CJ2A |
|
|
|
|
Post Reply
|
|
| Tweet |
| Forum Jump | Forum Permissions You cannot post new topics in this forum You cannot reply to topics in this forum You cannot delete your posts in this forum You cannot edit your posts in this forum You cannot create polls in this forum You cannot vote in polls in this forum |


 Topic Options