


|
|
|
Rebuilding my 2A |
Post Reply 
|
Page <1 234 |
| Author | |
damar2yxr 
Member 
Sponsor Member x 2 Joined: 23 Aug. 2010 Location: Watertown, Wisc Status: Offline Points: 2632 |
 Post Options Post Options
") Thanks(0) Thanks(0)
 Quote Reply Quote Reply
 Posted: 24 Aug. 2012 at 2:06am Posted: 24 Aug. 2012 at 2:06am |
|
Oh and by the way.....................I did all of this picture taking and data entry WHILE I was watching my GREEN BAY PACKERS play your CINCINNATI BENGALS.......................................
You're welcome.
I am usually non-deployable at gametime. Edited by damar2yxr - 24 Aug. 2012 at 3:02am |
|
|
eat,sleep,jeep
Proud father of a Marine, Army Dentist, Navy Pilot and a Princess. LIFE IS GOOD! 43MB,47CJ2-A,48CJ2-A X2,70Jeepster Commando 1/2 cab,84CJ-7, |
|
 |
|
|
Abend
Member
Joined: 21 Apr. 2012 Location: Erlanger, KY Status: Online Points: 201 |
Post Options
Thanks(0)
Quote Reply
Posted: 25 Aug. 2012 at 3:45am |
|
Thanks for the the pictures of your seat setup. I might just do that, although the angle iron route might make more sense for me since the tub hasn't been painted yet. The funny part is that I did the exact same thing you did for the bolt on the leg. I happened to have some washing machine feet sitting around that looked perfect for the job when I put the seats in. What I still can't figure out is why the passenger seat from my mom's 2A fits perfectly (didn't try the drivers side). That jeep has been in the family since the 50s (first owner was the US Navy) and the tub and seats are definitely original, so I was thinking maybe there was something odd about my seat frames.
|
|
|
|
|
Abend
Member
Joined: 21 Apr. 2012 Location: Erlanger, KY Status: Online Points: 201 |
Post Options
Thanks(0)
Quote Reply
Posted: 26 Aug. 2012 at 9:36pm |
|
Got a little more work done this weekend.
Saturday, August 25 I got the headlight buckets mounted into the grill and installed the headlights and wiring harnesses for them. Like the grill, the headlight buckets have some rust on them that will eventually be removed by the same guy who cleaned my transmission and transfer case housings for me, but that will be done right before the jeep gets painted (probably next spring). I also drilled holes for and mounted the 3-terminal strip where the headlight wiring harnesses terminate. Once I was done reinstalling the headlights, I measured, marked, and drilled the holes in the passenger side of the body for the spare tire carrier. I got the spare tire carrier bolted on and then attached a new wheel to it (no tire yet) to get it off the garage floor. Sunday, August 26 I drilled a hole and mounted the rearmost exhaust hanger, so now my exhaust system finally sits in the right place. I also removed all the caked-on crud that was covering my replacement intake and exhaust manifolds. I have what I believe are the last few engine parts I need on order, so I think I might be able to actually try to fire this thing up next weekend. |
|
|
|
|
Abend
Member
Joined: 21 Apr. 2012 Location: Erlanger, KY Status: Online Points: 201 |
Post Options
Thanks(0)
Quote Reply
Posted: 01 Sep. 2012 at 1:41am |
|
Thursday, August 30
I made a ton of progress after receiving a box from the man in the brown uniform containing some long missing parts. I reinstalled the valve cover since it had been installed backwards by the engine rebuilder (although I'm not sure it actually makes any difference) and replaced the gaskets. I installed three new manifold studs (the exhaust manifold had previously been held in place with a mix of studs and bolts) and installed my replacement intake/exhaust manifolds. Once those were in place, I reinstalled the carburetor. I drilled holes in the firewall for the emergency brake bracket and bolted that in place. I also installed a new anchor on the bottom side, resulting in a functional emergency brake for the first time. Once that was done, I filled the bottom pan of the air cleaner with oil and installed the air cleaner. The next item to install was the oil filter. I got it in, but I don't have the hoses quite right. Due to the excitement of being tantalizingly close to being able to start the engine, I decided it leave it as-is for the moment. I opened the oil filter and poured some fresh oil in to get the pump primed. I removed the spark plugs and cranked the engine - after about 30 seconds, I was reading about 5-10 PSI on the oil pressure gauge. Friday, August 31 I received a headlight switch in the mail today and got it installed. With that installed, I drilled holes for and mounted the high beam foot switch. Once both of those were wired, I tried out the lights. My passenger side headlight is very dim (my guess is that it's a grounding issue), so I'll have to sort that out later. Unable to resist the temptation any longer, I reinstalled the spark plugs and wires, filled the radiator (noting a leak from a valve on the water pump that won't close all the way), and hooked up a temporary fuel tank (originally part of a weed whacker). Filled with anticipation, I pushed the clutch pedal to the floor, pulled the choke all the way out, adjusted the throttle about halfway, and depressed the starter. Within 2-3 cranks, the engine roared to life. IT RUNS!  <-------- It took me at least an hour to stop looking like this. <-------- It took me at least an hour to stop looking like this.It's been 13 years, 9 months, and 19 days since the last time I sat behind the wheel of my jeep with the engine running. The last time I got this excited was when my youngest son was born. I still have a lot to do, but the finish line is definitely within sight. The next step is going to be to get the real fuel tank hooked up so I can take it for a short drive. 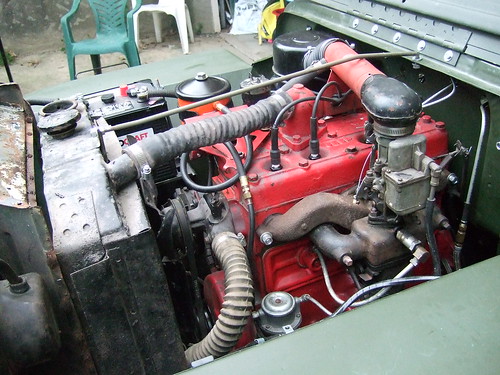 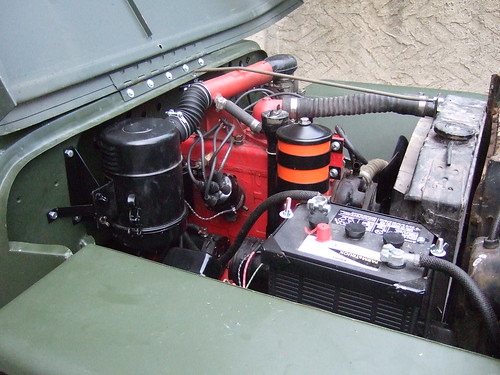 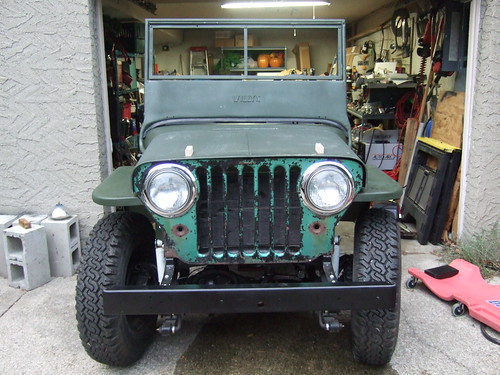 |
|
|
|
|
bkreutz
Member
Sponsor Member Joined: 17 Oct. 2006 Location: Fruitland Idaho Status: Offline Points: 7037 |
Post Options
Thanks(0)
Quote Reply
Posted: 01 Sep. 2012 at 2:08am |
|
Congratulations, it has to feel good.

|
|
|
|
|
berettajeep
Member

Sponsor Member Joined: 03 Feb. 2009 Location: Astoria OR Status: Offline Points: 4304 |
Post Options
Thanks(0)
Quote Reply
Posted: 01 Sep. 2012 at 4:02am |
|
AWESOME!

|
|
|
|
|
Abend
Member
Joined: 21 Apr. 2012 Location: Erlanger, KY Status: Online Points: 201 |
Post Options
Thanks(0)
Quote Reply
Posted: 03 Sep. 2012 at 2:53am |
|
Thanks for the kind words, guys.
Saturday, September 1 I enlarged one of the holes in the floor that had previously been cut for the fuel tank because it was about a quarter inch off where it should have been. With that done, I reinstalled the tank. Next, I pulled the fuel level sender to replace the gasket and discovered that the sender has no float (I have no idea how that can get lost). I tried hooking up just the sender to the gauge anyway so I could figure out whether I could just replace the missing float and found that it just bounces the needle from empty to full, regardless of position. I've added a sender to my shopping list. After playing around with the sender, I put it back in place with the new gasket and proceeded with the fuel line installation. I finally wrestled the new line into place and got it all hooked up. Next, I drilled a small hole for the fuel sender wire and installed that. I also got my oil line situation straightened out by using pieces of the old lines. Some previous owner had creatively attached about 10 different pipe thread adapters together to come up with what he needed, and those adapters came in handy in a few places. My oil filter now has just one line of the correct length attaching it to the base of the engine. After taking care of the oil lines, I needed to address the leaky valve on the water pump (I assume this was for a heater). I decided to pull the valve out and plug the hole. After some persuasion from the mapp torch, the valve unscrewed from the pump without incident. I didn't have a drain plug of the right size, so I used one of the thread adapters from the old oil lines and inserted a bolt into the adapter to seal it off. Finally, I reinstalled the driver's seat, filled the radiator (with plain water for this test run) and put a few gallons of gas in the tank. After I confirmed there were no leaks, my oldest boy and I closed the hood, folded the windshield, and hopped in. After the engine cranked several times, it fired up. I put it in gear and approached the top of the driveway. As gravity took over and the jeep accelerated at an alarming rate toward the road, I gave the brakes their first real world test. I'm happy to report that they worked fine and we didn't careen out if control. I ended up taking the jeep about a half mile down the road before turning back. During the test drive, I never got past second gear because the steering was downright scary. It turns out the toe-in was about 3-4 inches. That was one of the last items my mechanic had installed but I hadn't redone. I also noticed that the jeep was idling really fast. Despite those issues, the ride was absolutely awesome for both of us. Sunday, September 2 I got the toe-in adjusted to something much, much closer to the correct amount. I traced the fast idle to a bent throttle control linkage, which I was able to straighten. After getting that sorted, I replaced my makeshift drain plug on the water pump with a shiny new brass one. I was then able to fill the radiator with antifreeze and distilled water. After filling the radiator, I started the engine to work the air bubbles out. The engine runs, but it does sound like the timing is off. I'll have to see if I can free up my stuck distributor so I can try to adjust it. |
|
|
|
|
Abend
Member
Joined: 21 Apr. 2012 Location: Erlanger, KY Status: Online Points: 201 |
Post Options
Thanks(0)
Quote Reply
Posted: 23 Sep. 2012 at 4:44am |
|
It's been slow progress the last few weeks due to business travel, but still, I've made a little headway.
Friday, September 7 I picked up 4 new (to me) tires and 16" rims I bought from another member here from the Greyhound station (oddly, they seem to be the cheapest way to ship tires) and got them put on the jeep. That added about another inch and a half of height, so I'm going to have to get around to installing the steps sooner rather than later. When I pulled the jeep out, I noticed an antifreeze puddle. It appears that when I heated the fitting on the water pump to remove it, I must have cooked the seals, because the water pump is leaking around the fan shaft at the rate of about a gallon per day. I'll need to get a rebuild kit ordered. Saturday, September 22 I installed the chassis wiring harness and tail lights. While doing that, I noticed that the brake light switch on the master cylinder had a broken terminal, so I replaced it with an extra I had on hand. I also drilled holes in the transmission crossmember for the emergency brake cable clamp so I could get that moved to the correct location. I had previously had it installed on one of the transmission mount bolts, but I saw a picture recently that made me realize I had done it incorrectly. The emergency brake now works much better. I still need to get some weatherproof connectors so I can finish connecting the tail/brake lights. I'm also still working on getting my stuck distributor freed from the engine block. I think I'm going to need to replace it once I get it freed, since I managed to chip the rim a little bit and the cap now can rotate a couple of degrees. |
|
|
|
|
BOWJA01
Member

Joined: 29 Oct. 2009 Location: South Jersey Status: Offline Points: 525 |
Post Options
Thanks(0)
Quote Reply
Posted: 26 Sep. 2012 at 2:03am |
|
got any pics of how u wired the tail lights...
|
|
|
Jim
|
|
|
|
|
Abend
Member
Joined: 21 Apr. 2012 Location: Erlanger, KY Status: Online Points: 201 |
Post Options
Thanks(0)
Quote Reply
Posted: 26 Sep. 2012 at 11:01pm |
|
Sure, got any specific things you want to see? I used a wiring harness built for two tail lights from Walck's.
|
|
|
|
|
BOWJA01
Member
Joined: 29 Oct. 2009 Location: South Jersey Status: Offline Points: 525 |
Post Options
Thanks(0)
Quote Reply
Posted: 26 Sep. 2012 at 11:34pm |
|
got the same one from walcks... how did you run and attach the wire from the drivers side to the passengers side?
|
|
|
Jim
|
|
|
|
|
Abend
Member
Joined: 21 Apr. 2012 Location: Erlanger, KY Status: Online Points: 201 |
Post Options
Thanks(0)
Quote Reply
Posted: 27 Sep. 2012 at 12:01am |
|
I ran the wire over the top of the V brace and rear crossmember. I attached two of the cable clips to the tailgate hinge bolts and I screwed an extra one into the bracing on the passenger side to keep all the wires away from the tailpipe. My harness was maybe 6-8 inches longer than needed, so I just looped the extra cable before securing it.
--Edit to add: I was able to get these shots while the jeep was still in the cramped garage. I hope these help. 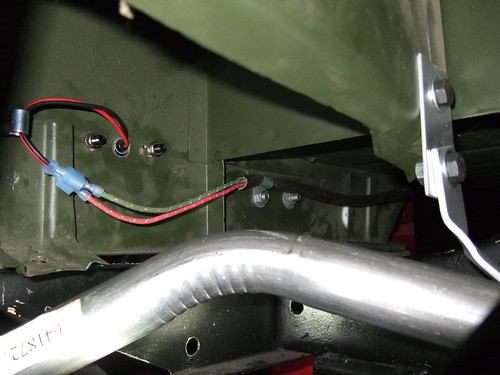 Passenger side 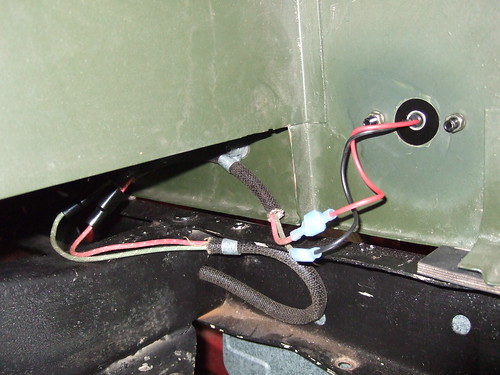 Driver side Edited by Abend - 27 Sep. 2012 at 2:31am |
|
|
|
|
BOWJA01
Member
Joined: 29 Oct. 2009 Location: South Jersey Status: Offline Points: 525 |
Post Options
Thanks(0)
Quote Reply
Posted: 02 Oct. 2012 at 12:02am |
|
Yes, thanks! I appreciate you taking the time!
|
|
|
Jim
|
|
|
|
|
Abend
Member
Joined: 21 Apr. 2012 Location: Erlanger, KY Status: Online Points: 201 |
Post Options
Thanks(0)
Quote Reply
Posted: 12 Oct. 2012 at 2:13am |
|
Sunday, October 7
I removed my leaky water pump and started disassembling it in preparation for a rebuild and ended up completely destroying it in the process. After performing a post-mortem on the pump, I figured out where I screwed up. I was attempting to press the shaft out from the impeller side, and I thought the shaft would come out neatly through the pulley. Examination of the shattered pieces of the former pump revealed that I should have supported the pump body to allow the pulley to remain in place on the shaft. Live and learn. Thursday, October 11 I got my replacement pump today and got it installed without incident. I refilled the radiator and so far, no leaks. In the same box from Walck's, I recieved a TightSteer so I installed that too. It took under 5 minutes to install and while I haven't driven with it yet, the difference on the steering wheel is stunning. I had an inch or so of slop in the wheel in the center position before, and now there is none. I've only driven about a mile since rebuilding the box completely, so it's not like there's a lot of wear in it. I'm looking forward to a test drive. |
|
|
|
|
Abend
Member
Joined: 21 Apr. 2012 Location: Erlanger, KY Status: Online Points: 201 |
Post Options
Thanks(0)
Quote Reply
Posted: 21 Oct. 2012 at 10:54pm |
|
Sunday, October 21
I got some of the last parts installed today. I started by measuring and drilling a hole for the high beam indicator lamp, which went in painlessly. Next I drilled the holes for the dash board data plate and installed it. After that, I drilled the fender and hood for the hood latches and installed those. I finally got the bumper fully attached with grade 8 bolts. I drilled holes in the body for the transfer case boot retaining ring and got that installed as well. Lastly, I installed the serial number plate under the hood. Sadly, the original was missing and I can't seem to find the title anywhere, so I've used one from a 3A (it probably more accurately describes the blend of 2A and 3B parts that make up my jeep anyway). I just have a few more steps before the jeep will be ready to disassemble again for painting, although that's going to have to wait until Spring. 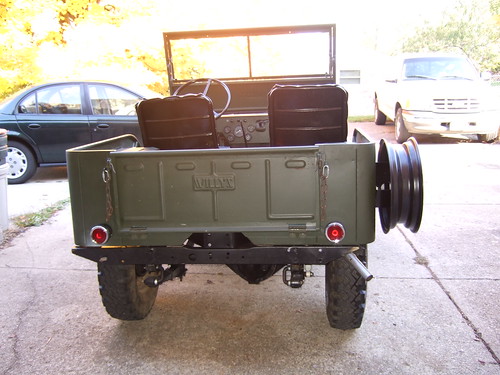 The tail lights I installed a couple of weeks ago 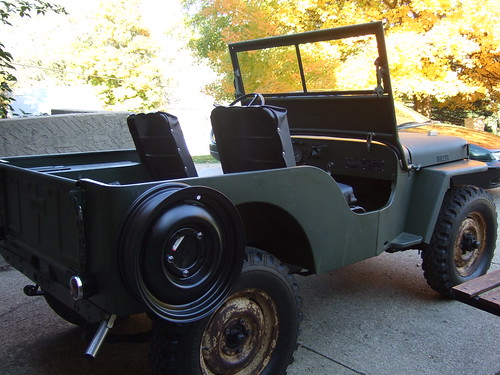 Still need a spare tire on that wheel, but I'm definitely getting there 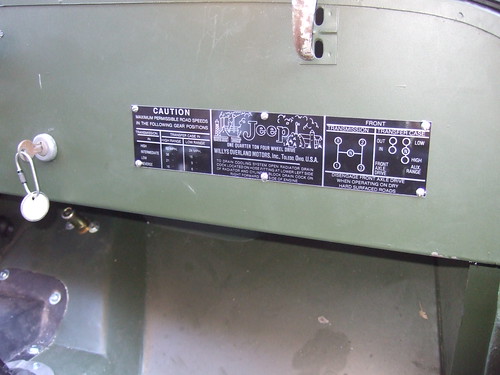 Data plate installed  The instrument panel is finally complete (other than cleaning and painting) 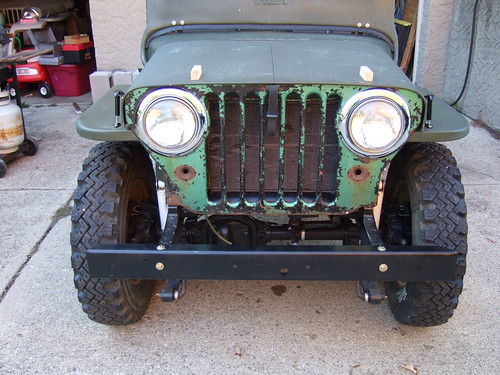 Hood latches installed and bumper bolted in |
|
|
|
|
jeep4752
Member

Joined: 20 Jan. 2010 Location: Ont. Canada Status: Offline Points: 237 |
Post Options
Thanks(0)
Quote Reply
Posted: 22 Oct. 2012 at 1:52am |
|
Congrats on your progress! I'm sure alot of beginners will appreciate how indepth you are with your descriptions of what you went through.
|
|
|
Flat fenders forever!
|
|
|
|
|
Post Reply
|
Page <1 234 |
| Tweet |
| Forum Jump | Forum Permissions You cannot post new topics in this forum You cannot reply to topics in this forum You cannot delete your posts in this forum You cannot edit your posts in this forum You cannot create polls in this forum You cannot vote in polls in this forum |


 Topic Options